This post may contain affiliate links. Please read our disclosure policy.

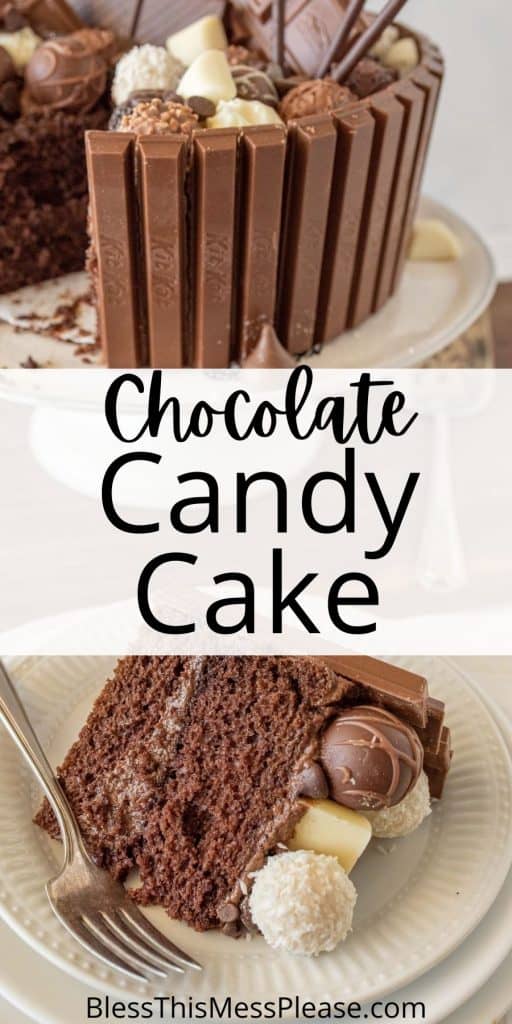
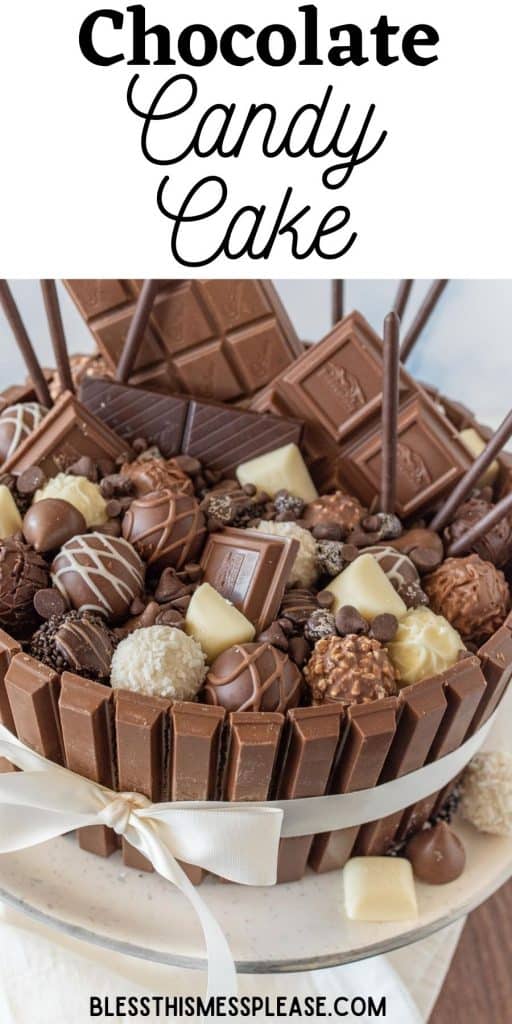
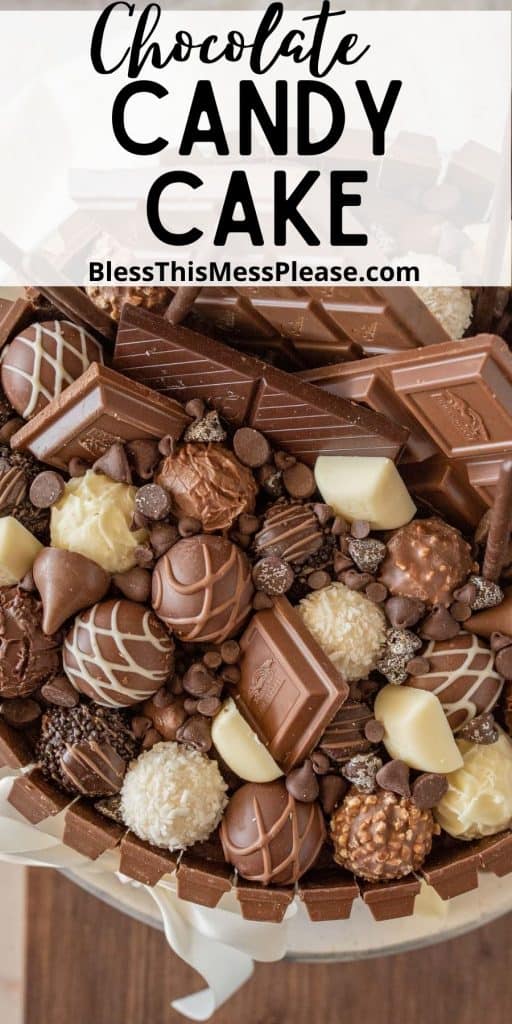
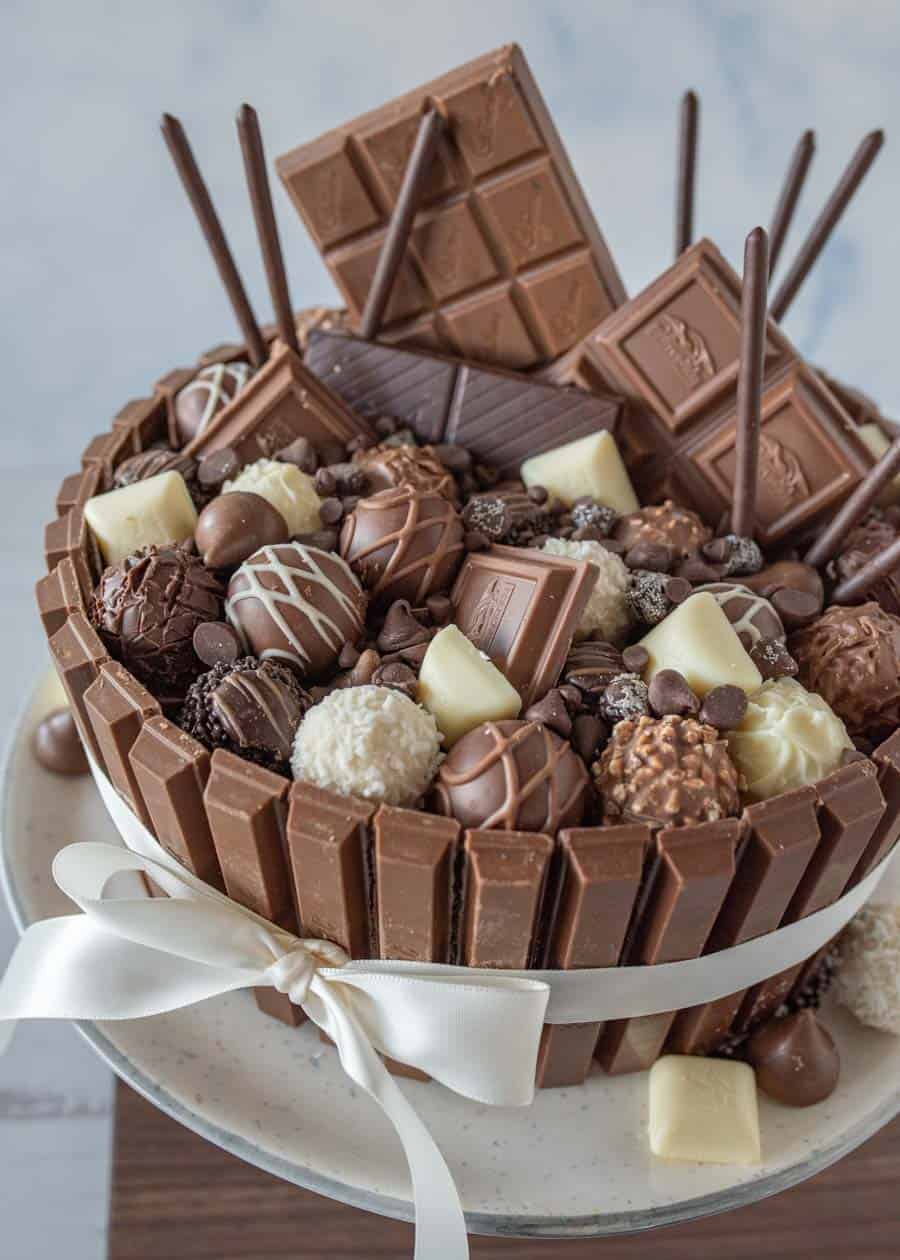
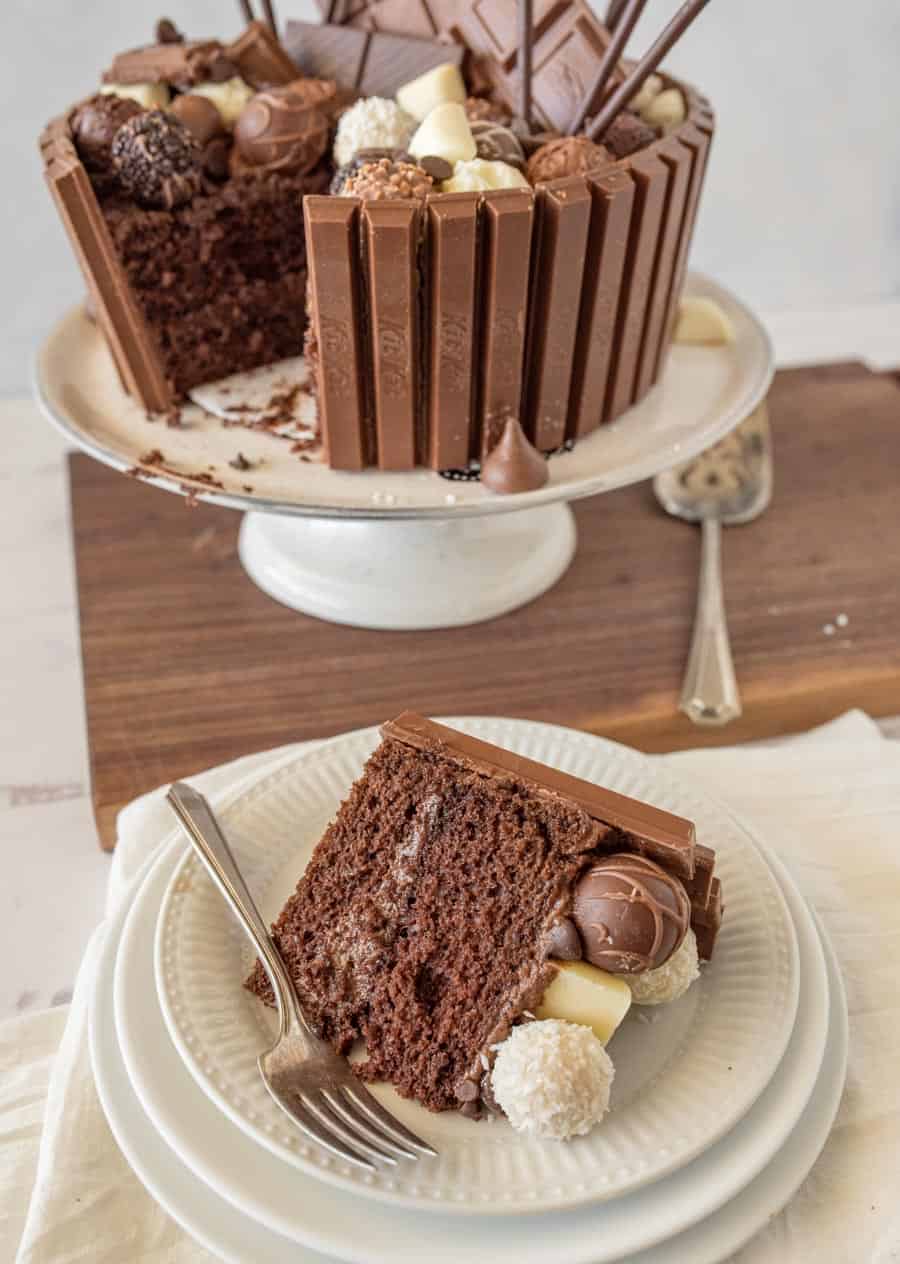
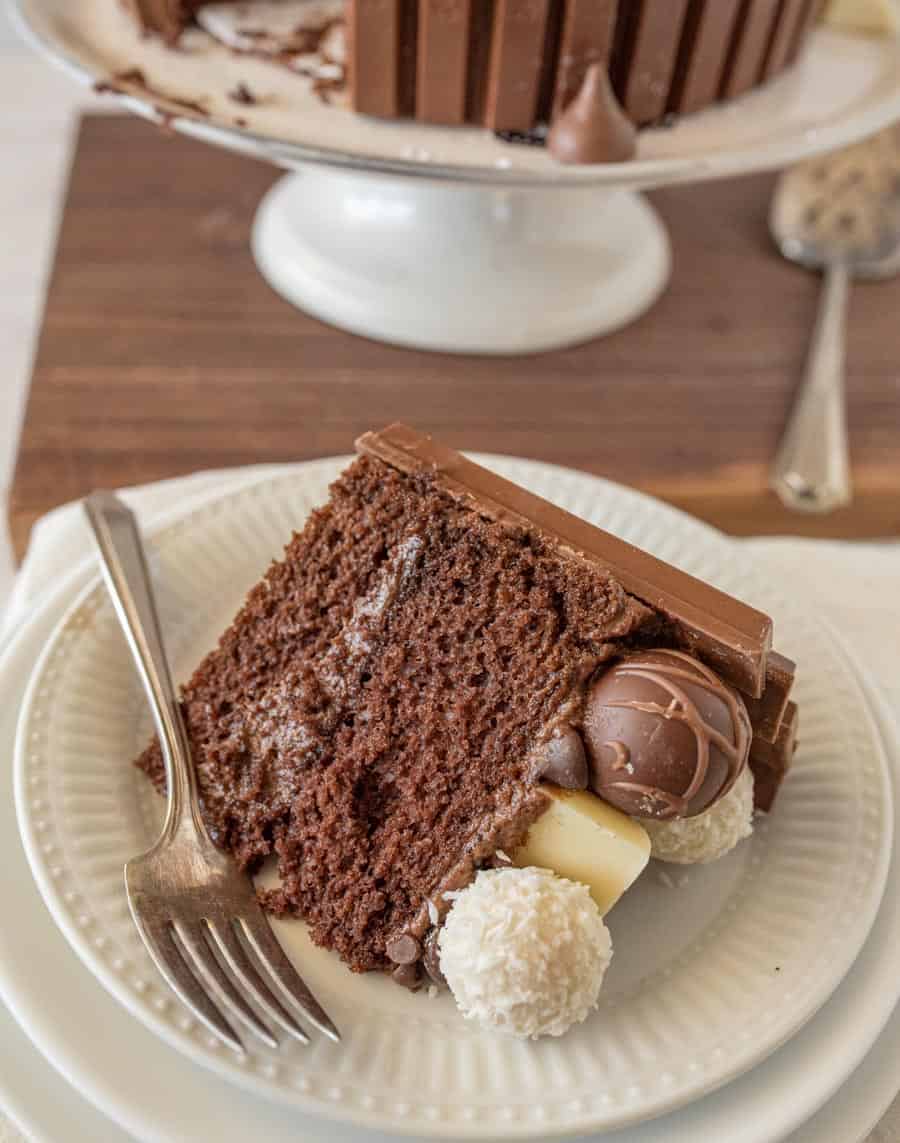
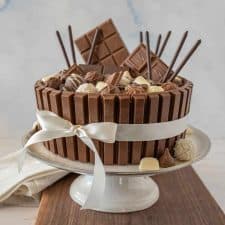
I’ve heard that chocolate makes everything better and I tend to agree! This Chocolate Candy Cake is sure to boost your spirits and brighten your day. It starts with two layers of chocolate cake covered in decadent frosting, the ends being surrounded by Kit Kats, and add to the wow factor, is topped with all the chocolate candies. It turns out beautiful and is super easy to make too.

I love to make this cake for birthdays, friend gatherings, or for a festive potluck dessert. It really is simple and perfect for people who don’t love decorating cakes. You can use a box cake mix and that will really speed up the process as well.
I’ve seen this cake baked with lots of variations and that is what makes it so fun. Depending on the occasion you can switch up the color of candies on top and really customize the cake. You can also personalize it with cake flavors such as funfetti, strawberry, banana, German chocolate, or chocolate peanut butter. If you prefer candy over chocolate, try my colorful candy cake.
Table of Contents
Why You’ll Love This Recipe
- The visually striking candy-covered exterior makes this cake a stunning centerpiece for any celebration, impressing both kids and adults alike.
- Decorating this cake is not only easy and enjoyable, but also customizable to your favorite treats.
- The combination of butter, sugar, and cocoa powder ensures a deeply rich and moist cake that melts in your mouth.
- The smooth, creamy frosting made from butter and powdered sugar adds a perfect layer of sweetness and enhances the chocolate flavor.
Recipe Ingredients
- Flour – All-purpose
- Sugar – You will need granulated and powdered sugar
- Eggs – Room temperature
- Butter – Room temperature
- Milk – Can be subbed with a dairy-free alternative
- Chocolate Candies – I used KitKats bars, Pocky Sticks, whole chocolate bars, Chocolate Truffles, and an assortment of white, milk, dark chocolate in interesting shapes or textures
- Vanilla
- Cocoa powder
- Baking soda
- Salt
See the recipe card below for full information on ingredients and quantities
How to make Chocolate Candy Cake
Step 1. Preheat oven to 350°F, line and grease two 9-inch cake pans.
Step 2. Cream butter, sugar, eggs, and vanilla. Add dry ingredients and ice water alternately. Divide batter between pans and bake for 27-30 minutes. Cool completely.
Step 3. Beat butter, cocoa, powdered sugar, and salt. Add milk gradually until smooth and fluffy.
Step 4. Frost the cake, then decorate with KitKats and assorted chocolates, securing with a ribbon.
Recipe FAQs
You will use about 30-35 Kit Kats to surround the cake. Make sure you are using the full size and not the minis.
The options are endless. You can put Twix, Reeses, Butterfingers, M&Ms or any of your favorite candies. Feel free to use your imagination and get creative with this cake.
You want to make sure that your cake is 100% cooled before you attempt to frost it. Usually about 2 hours is a good time frame to wait.
Expert Tips
- Ensure the butter and eggs are at room temperature before mixing. This helps achieve a smoother, well-incorporated batter and a lighter, fluffier cake texture.
- When adding dry ingredients and water to the butter mixture, alternate between them in small batches. This method helps maintain the batter’s consistency and prevents overmixing, ensuring a tender cake.
- Allow the cakes to cool in the pans for 10 minutes before transferring them to a wire rack. This step helps the cakes firm up slightly, making them easier to handle and reducing the risk of breaking. Also make sure that your cake is 100% cooled before frosting it.
- Decorate the cake immediately after frosting to ensure the KitKats and other candies stick well. Doing this while the frosting is still fresh and tacky will help keep your decorations securely in place.
How to Serve and Store Chocolate Candy Cake
Serve this cake at room temperature to ensure the frosting is smooth and the candy decorations remain intact. Use a sharp knife to cut through the KitKats and the cake layers cleanly. For a visually appealing presentation, tie a ribbon around the cake and remove it just before slicing.
This cake can be stored in an airtight container at room temperature for up to 2 days. If the temperature is warm, refrigerate the cake to prevent the frosting and candy from melting. When refrigerating, cover the cake to prevent it from drying out.
To freeze, wrap the undecorated cake layers tightly in plastic wrap and then in aluminum foil. You can store in the freezer for up to 2 months. Thaw the layers in the refrigerator overnight before assembling and decorating. Avoid freezing the cake with the candy decorations, as they may become sticky or lose their texture upon thawing.
More Cake Recipes to Consider
From Scratch Recipes
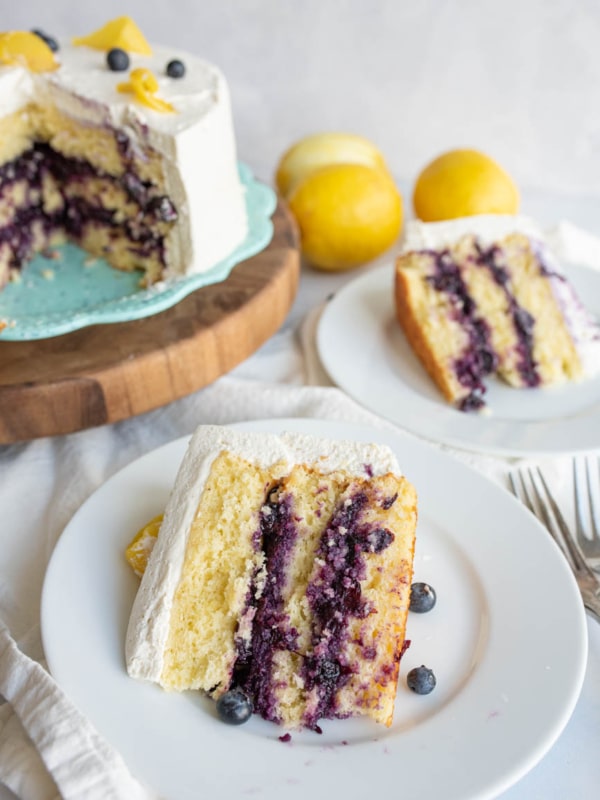
Easy Lemon Blueberry Layer Cake
Simple Gingerbread Recipes
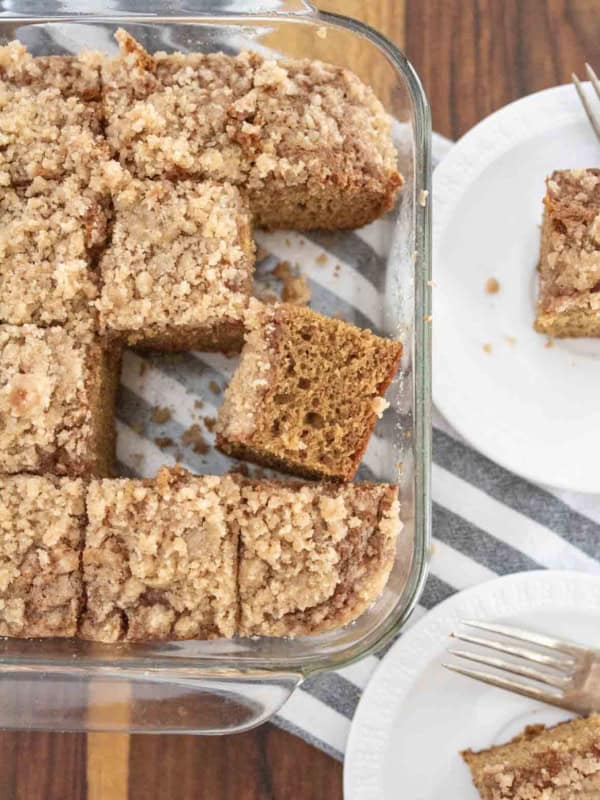
Gingerbread Coffee Cake
Did you make this recipe? Leave a ⭐️ review and share it on Instagram, Facebook, or Pinterest!
Chocolate Candy Cake
Ingredients
For the Cake:
- 2/3 cup butter, at room temperature
- 1 3/4 cup granulated sugar
- 2 large eggs
- 1 teaspoon vanilla
- 1/2 cup cocoa powder
- 1/2 teaspoon salt
- 2 1/2 cup all-purpose flour
- 1 1/2 teaspoon baking soda
- 1 1/2 cup ice water
For the Frosting:
- 1 /2 cup butter, at room temperature
- 1/4 cup cocoa
- 2 cups powdered sugar
- Pinch of salt
- 2-6 tablespoons milk
For the Candy:
- Large ribbon long enough to go around the cake and tie
- 35-40 Chocolate KitKats sticks, (10 KitKat bars)
- Pocky Sticks
- 2 whole chocolate bars
- Chocolate Truffles that are round
- Assorted chocolates, white, milk, dark chocolate that are interesting shapes or textures
Instructions
- Prepare two 9-inch round cake pans by lining the bottom with a piece of parchment paper and greasing the sides well with shortening or softened butter.
- Preheat the oven to 350 degrees F.
- In a large bowl cream the butter, sugar, eggs, and vanilla together until smooth.
- In a medium mixing bowl add the cocoa powder, salt, flour, and baking soda. Use a whisk to fully combine.
- Add half of the dry ingredients to the butter mixture and beat well to combine.
- Add half of the water to the butter mixture and beat well to combine.
- Add the last half of the dry ingredients to the batter and beat well to combine.
- Add the last half of the water to the dry ingredients and beat well to combine.
- Divide the prepared batter evenly between the two prepared pans. Smooth the top of the batter.
- Bake at for 27-30 minutes or until the cake springs back when lightly touched.
- Allow the cake to cool for 10 minutes on a cooling rack before inverting it onto a cooling wrack and removing the parchment paper. Allow the cake to cool completely before adding the frosting and chocolate candy.
- To make the frosting add the butter, cocoa, powdered sugar, and salt to a large bowl and beat to combine. Add the milk, 1 tablespoon at a time until the frosting is very smooth.
- Beat an additional 2 minutes until light and fluffy.
- Assemble the cake by placing one layer of cake on your cake stand. Add 1/3 cup of frosting to the top and spread it around. Place the second layer of cake on top of the first. Use the remaining frosting to cover the sides and tops of both stacked layers of cake.
- To decorate the cake, while the chocolate frosting is still fresh (decorate right after you frost it so that the frosting doesn’t have time to form a crust, this will help your candy stick better) break all of the Kit Kats apart and start lining the edge of the cake.
- Once you have gone around, use a big ribbon to hold the Kit Kats onto the cake.
- After I added the ribbon I went back over the Kit Kats and wiggled them closed together, adding a few more sticks where needed.
- Fill in the top of the cake with your favorite candy chocolate candy as pictured in the blog post.
- I like to have a few large pieces of chocolate bar and pocky sticks standing up on the cake for some height and then I filled the rest in with pieces of chocolate, chocolate candies, and truffles.
- Enjoy!
Notes
- You don’t have to make a cake from scratch to make a candy cake. Feel free to use a boxed cake mix and canned frosting if that makes your life easier.
- I used rice crispy treats instead of cake for this colorful candy cake and you could do the same thing for this chocolate candy cake if you’d like it to be a no bake dessert. The candy is what really makes this special.
- We used all kinds of chocolates, truffles, and candy bars, use what you like and look for things that have interesting shapes and textures. We also used some chocolate chips and Hershey’s Kisses to help fill in some space.


I baked this cake for a neighbor’s birthday. Everyone was so impressed saying people would pay 100 bucks for it and that it belonged in a magazine! Thank you!
I love that Cindy! I’m sure it was beautiful!
beast cake i made, i love chocolate so i made this it’s fun to make cake.
Looking forward to making this for a man’s birthday a brilliant idea