This post may contain affiliate links. Please read our disclosure policy.


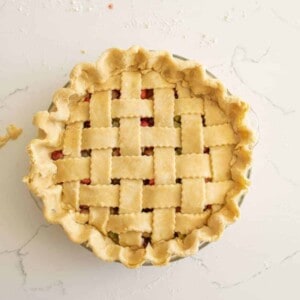
Learning how to make a lattice top for a pie is a fun skill to master and an extra pretty way to finish a pie.
If you have never done it, making a lattice pie crust might be a bit intimidating, but I am here to walk you through each step to a beautiful pie crust so that you can do it at home with ease!
Once you do it, you will wonder what has taken you so long to put this extra special touch on your fruit pies.
This lattice crust recipe works great on cherry pie, apple pie, strawberry rhubarb pie, and mixed berry pie.
Table of Contents
Why You’ll Love This Recipe
- It’s a fun way to add a little pizzazz to your pie.
- The lattice top can help thicken and set fruit pies.
- It’s not hard once you are familiar with the steps.
Recipe Ingredients
- All-purpose flour
- Salt
- Shortening
- Cold butter
- Ice-cold water
See the recipe card below for full information on ingredients and quantities.
How to Make a Lattice Pie Crust
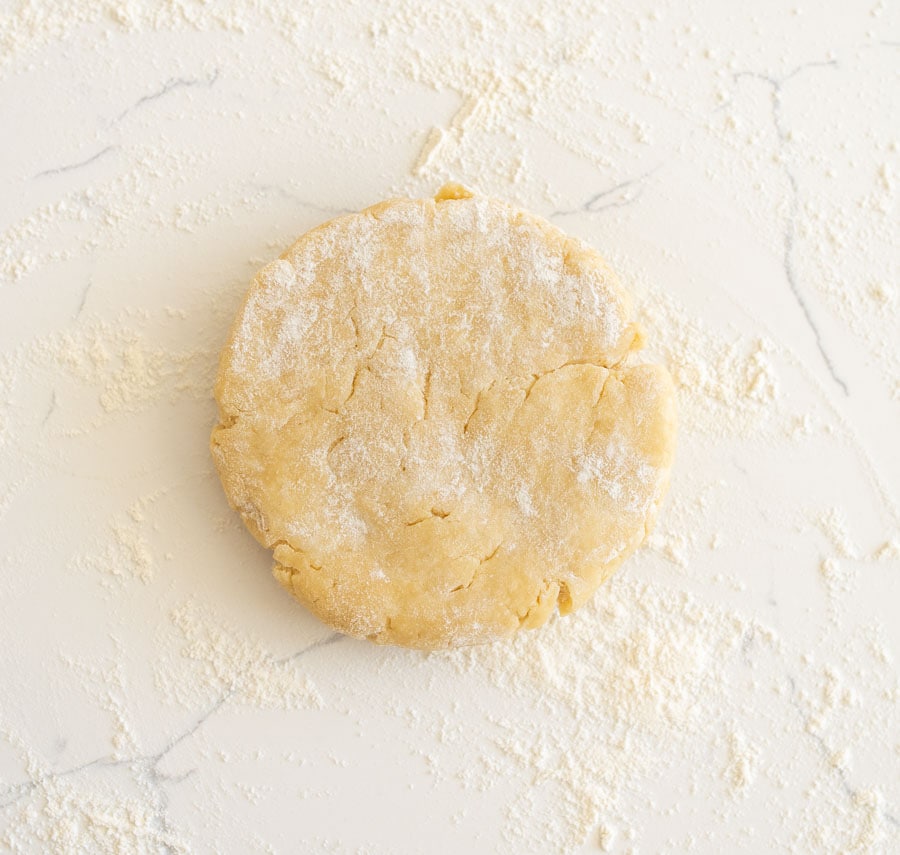
Step #1. Prepare your pie dough and let it rest in the fridge for at least 30 minutes before using.
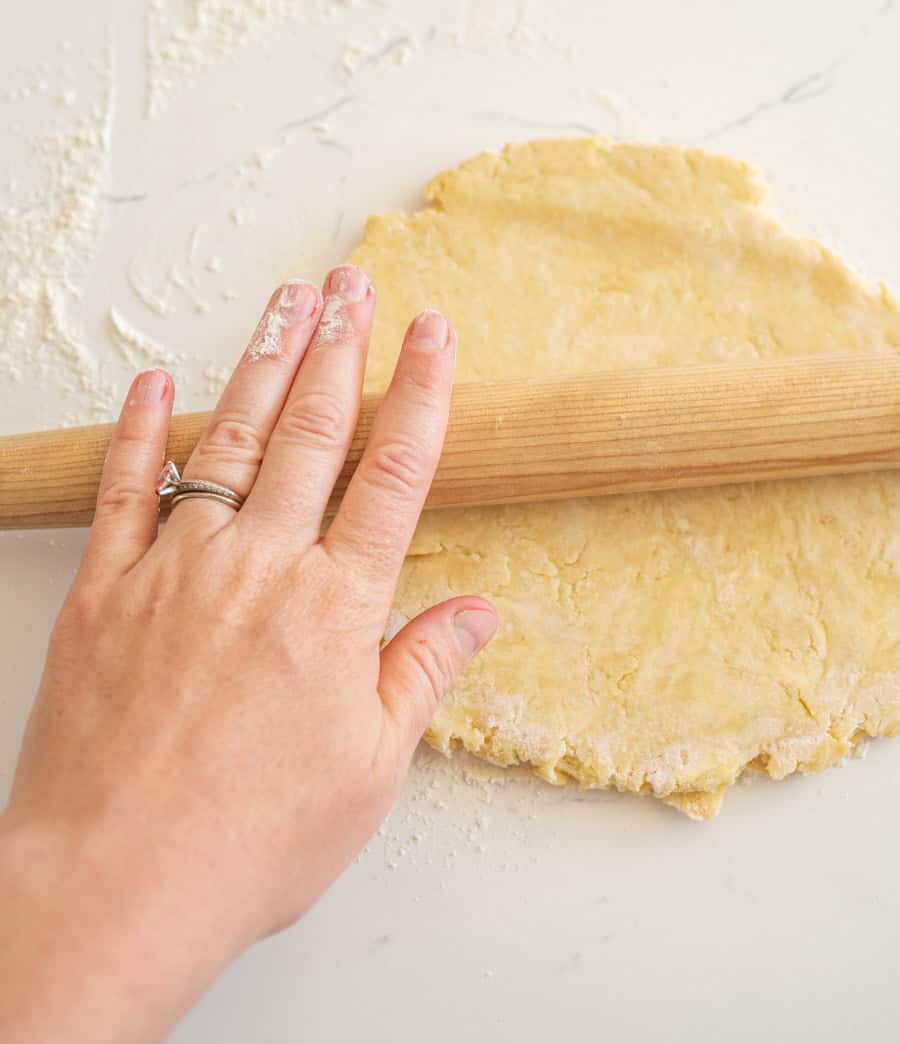
Step #2. Roll out the pie crust on a lightly floured surface.
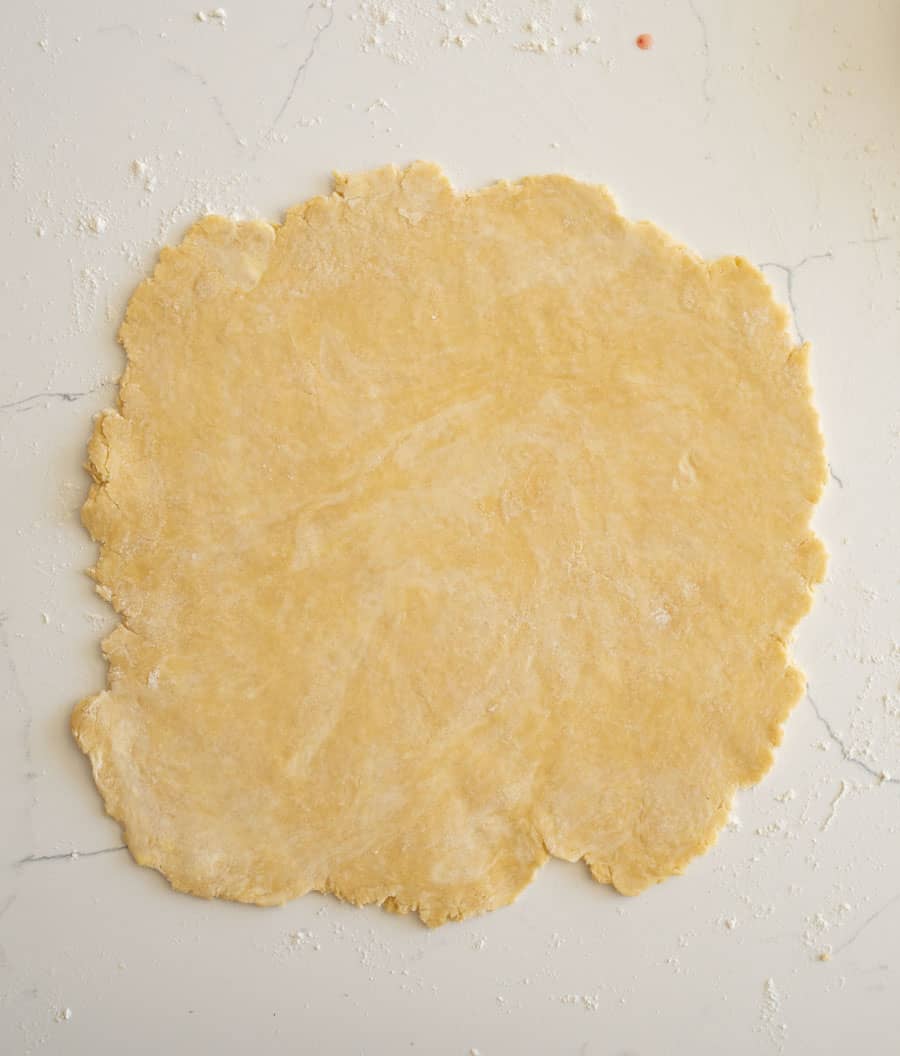
Step #3. Rotate the crust to help it roll out evenly. Add more flour to the rolling surface and the top of the dough as needed to ensure that the pie crust doesn’t stick.
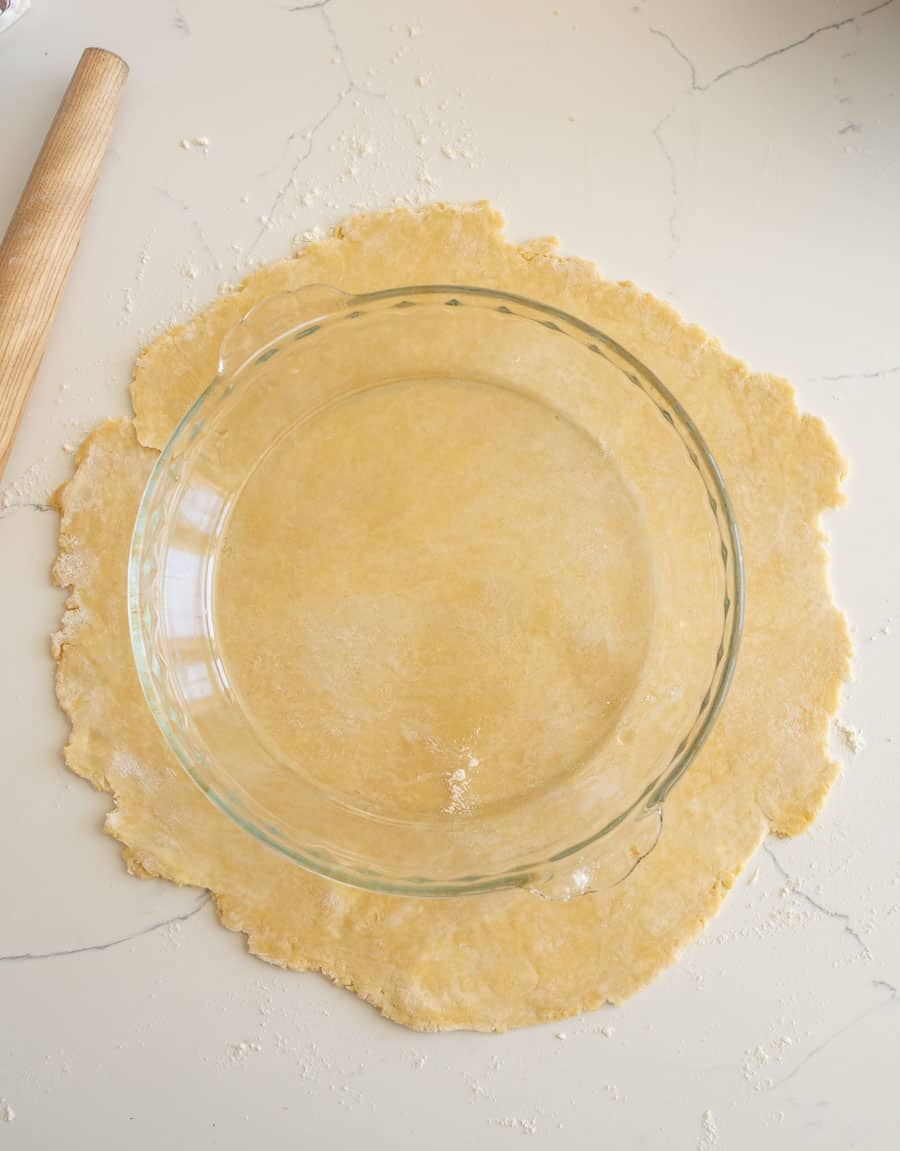
Step 4. Make sure that the pie crust is larger (by about 2 inches) than your pie plate by placing your pie plate on top of the rolled dough.
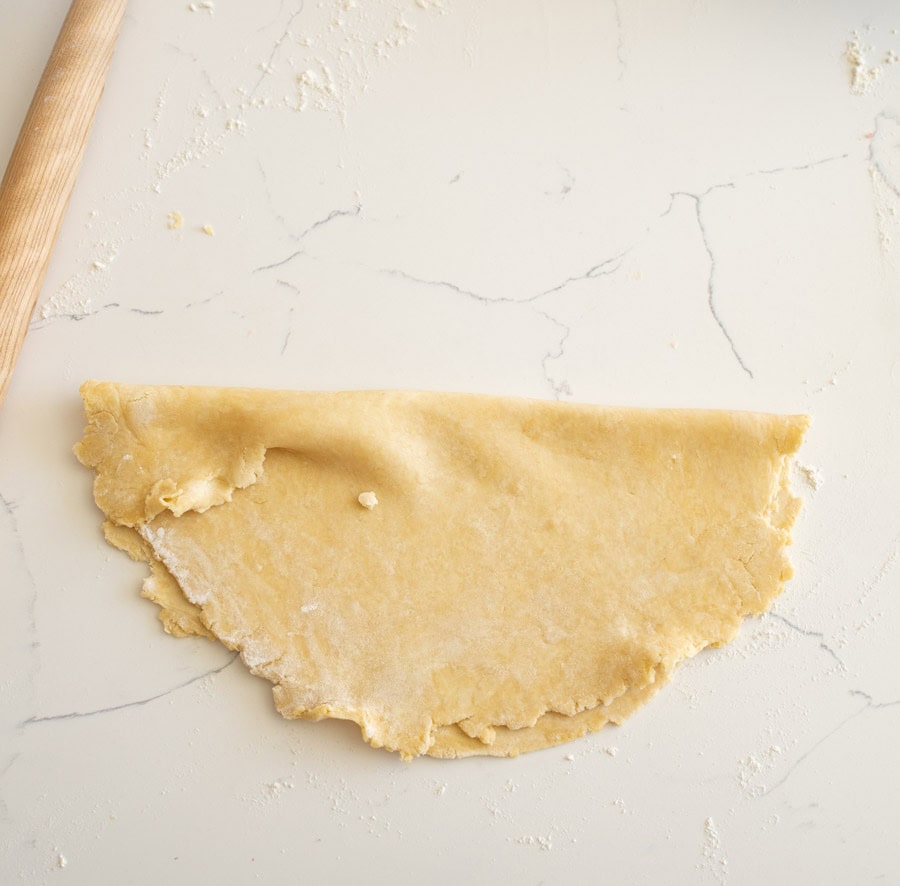
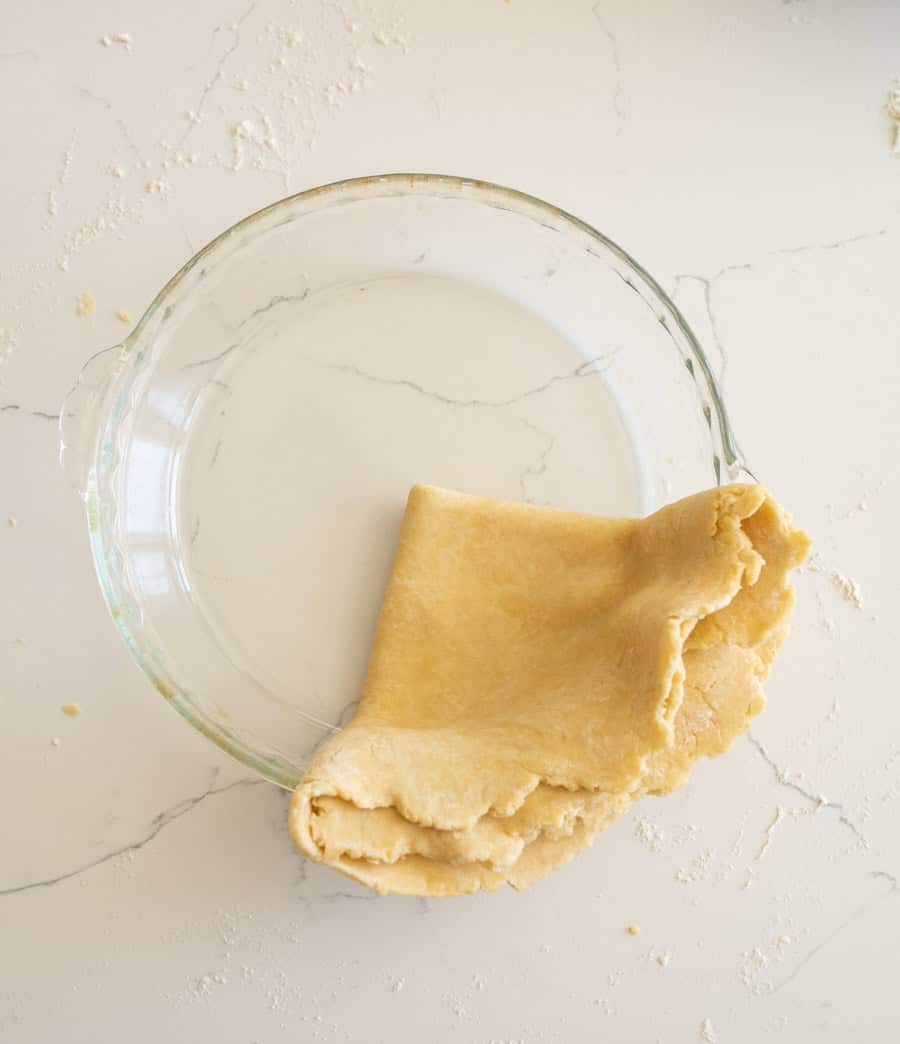
Step #5. Remove the pie plate from the dough and gently fold the pie dough in half.
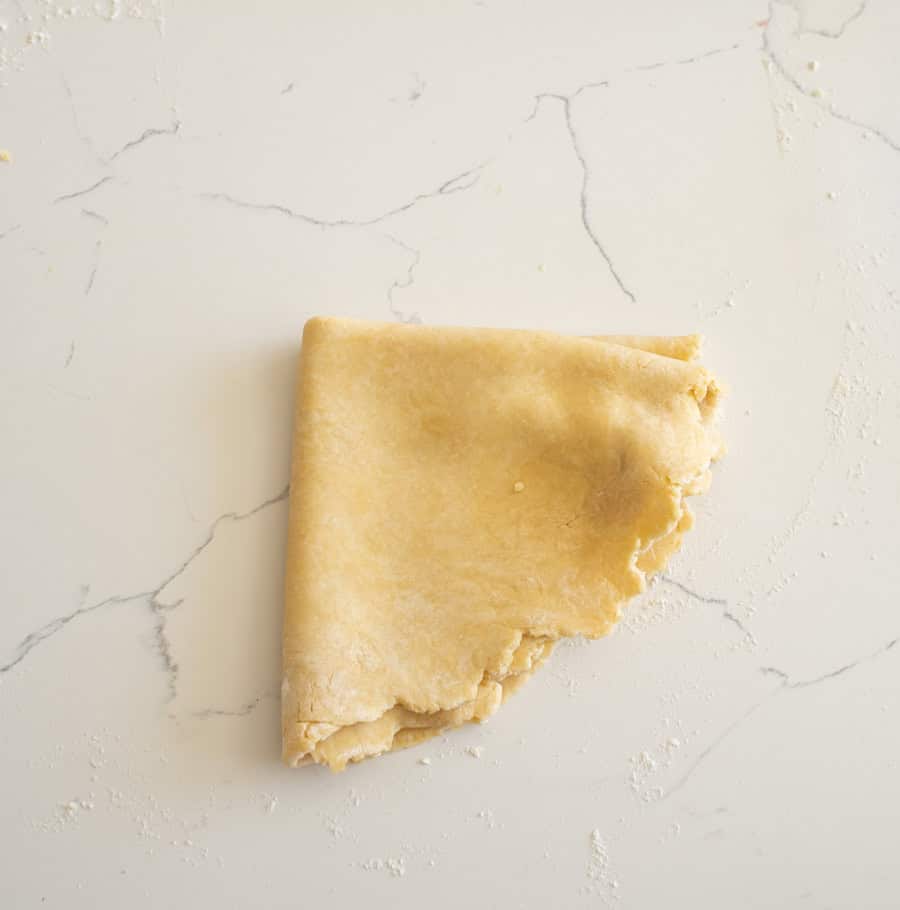
Step #6. Gently fold the pie crust in half again.
Step #7. Place the pie crust in an ungreased pie plate, stick it in the corner so that it evenly covers a quarter of the plate.
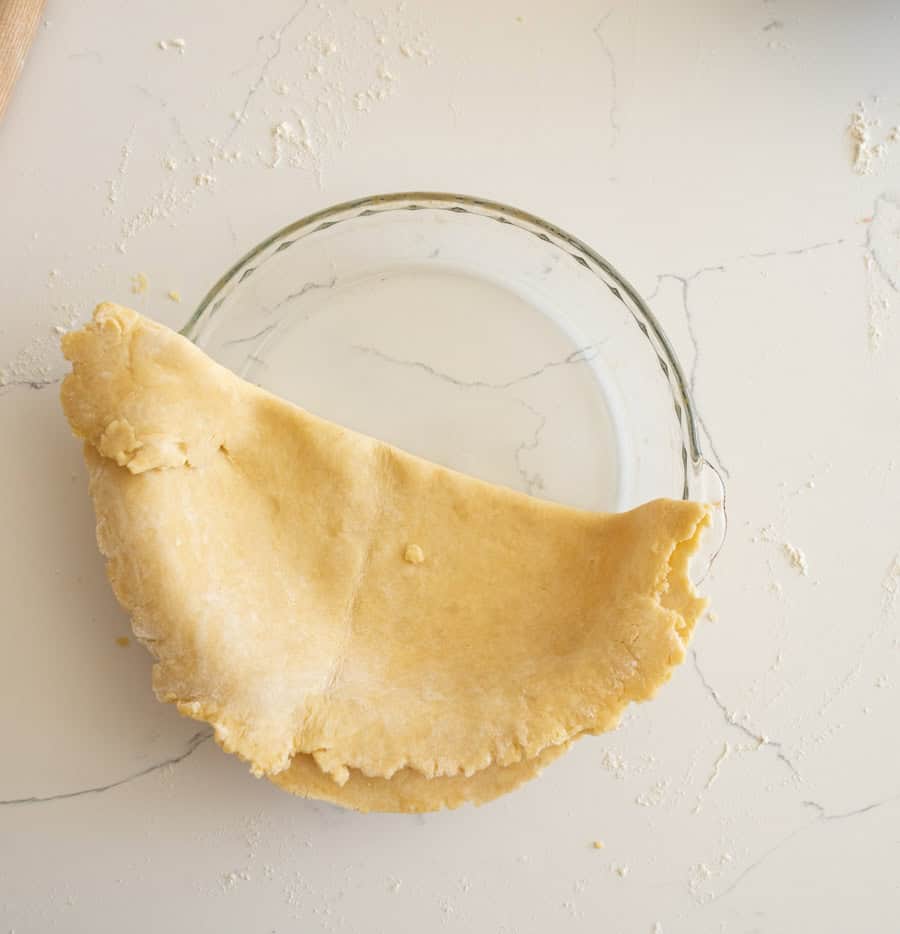
Step #8. Unfold the pie dough once so that it’s covering half of the pie pan.
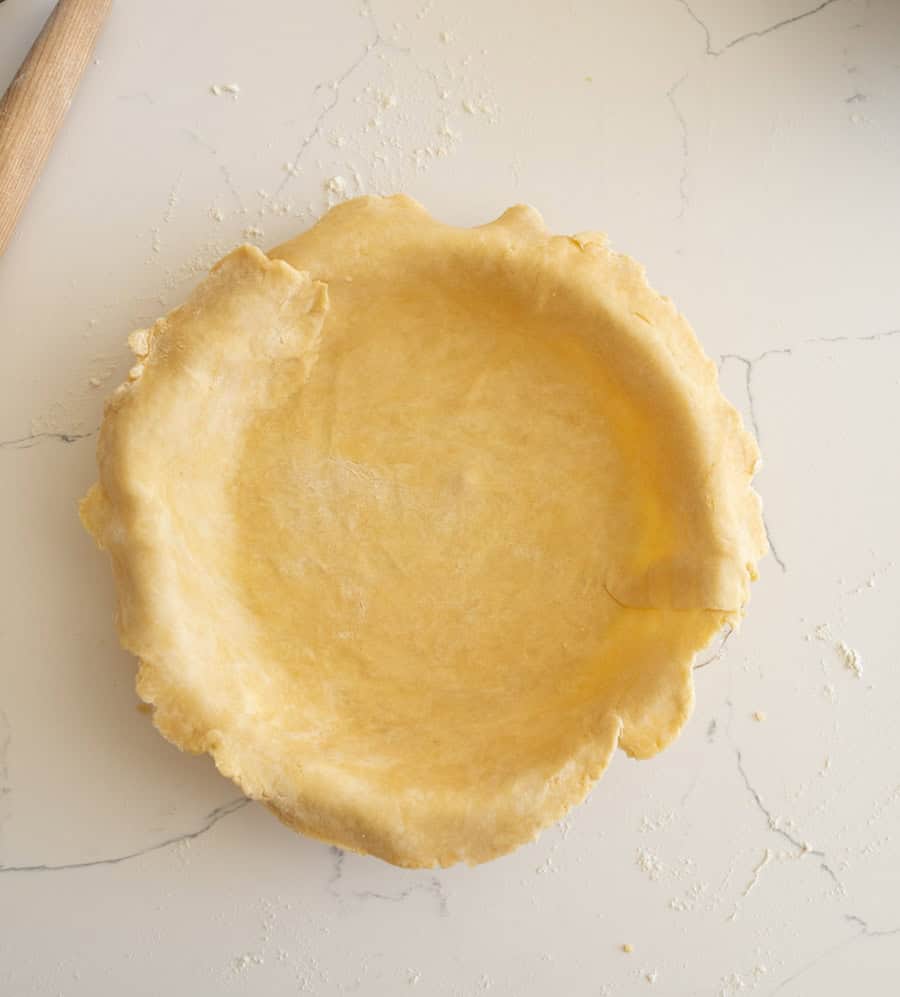
Step #9. Unfold the pie dough fully so that it fills in the whole pie plate. Gently press the pie dough into the bottom of the pan.
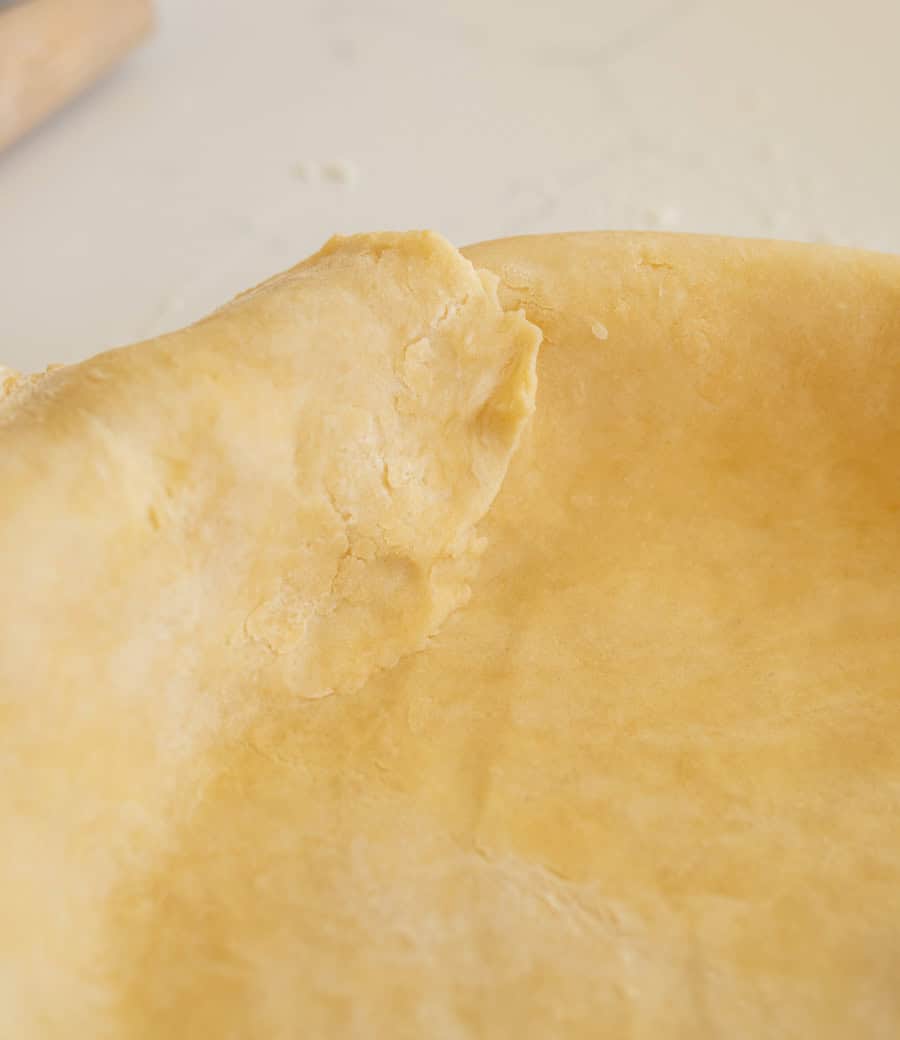
Step #10. Make sure that the edges of the dough fully cover the pie plate, pull the dough gently to adjust it.
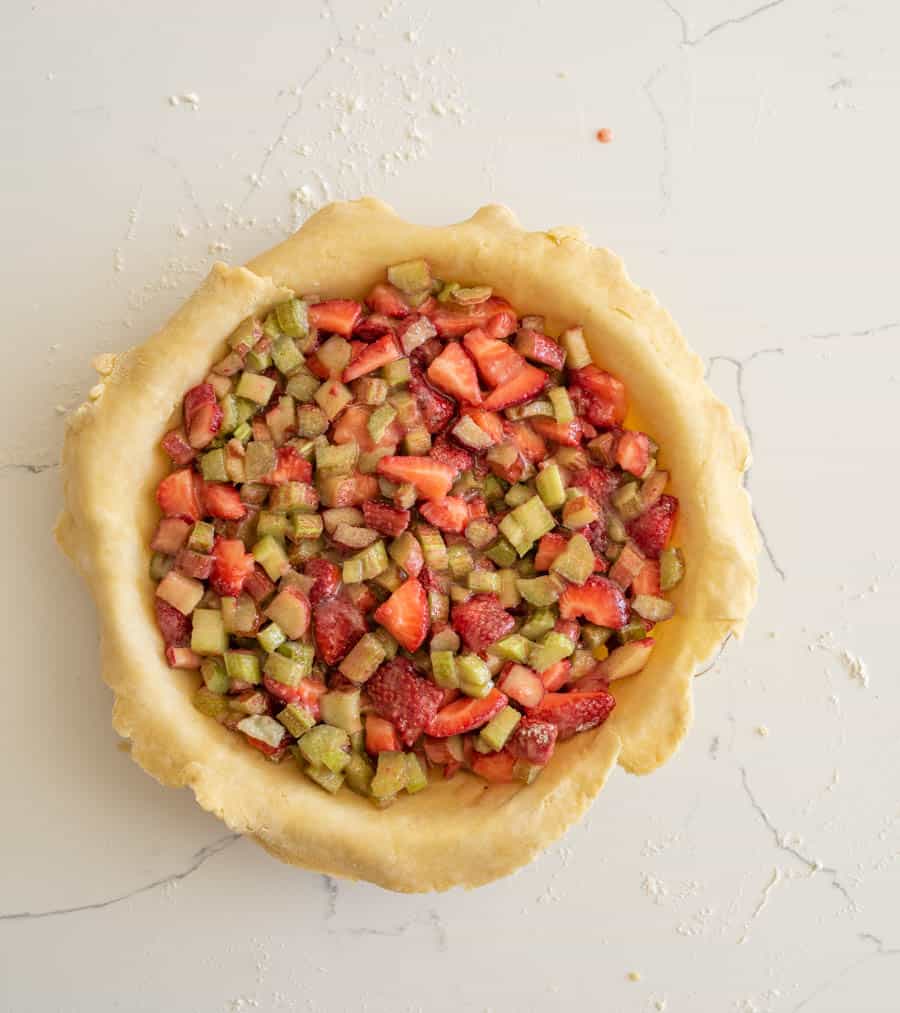
Step #11. Fill the pie with the pie filling as called for in your recipe.
Step #12. Roll out a second pie crust on a lightly floured surface like you did the first pie crust about 12 inches wide.
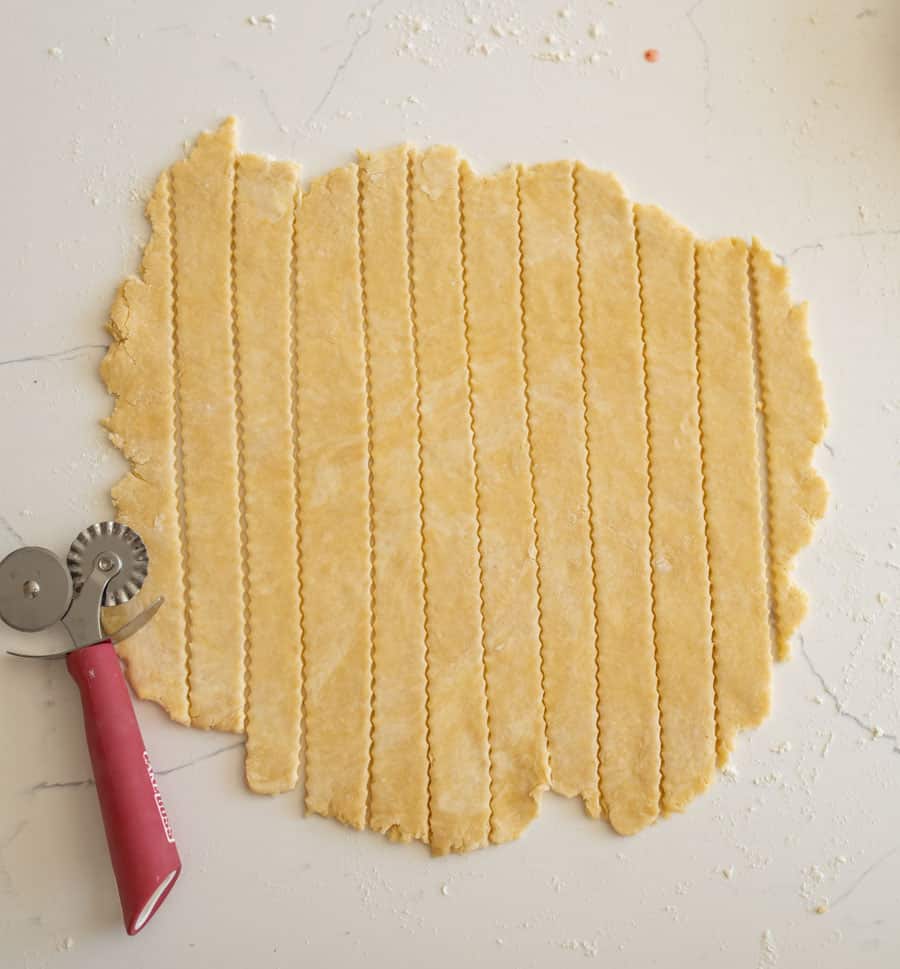
Step #13. Cut the pie crust into 12 even strips about 1-inch wide using a pizza cutter, pastry cutter, or sharp knife.
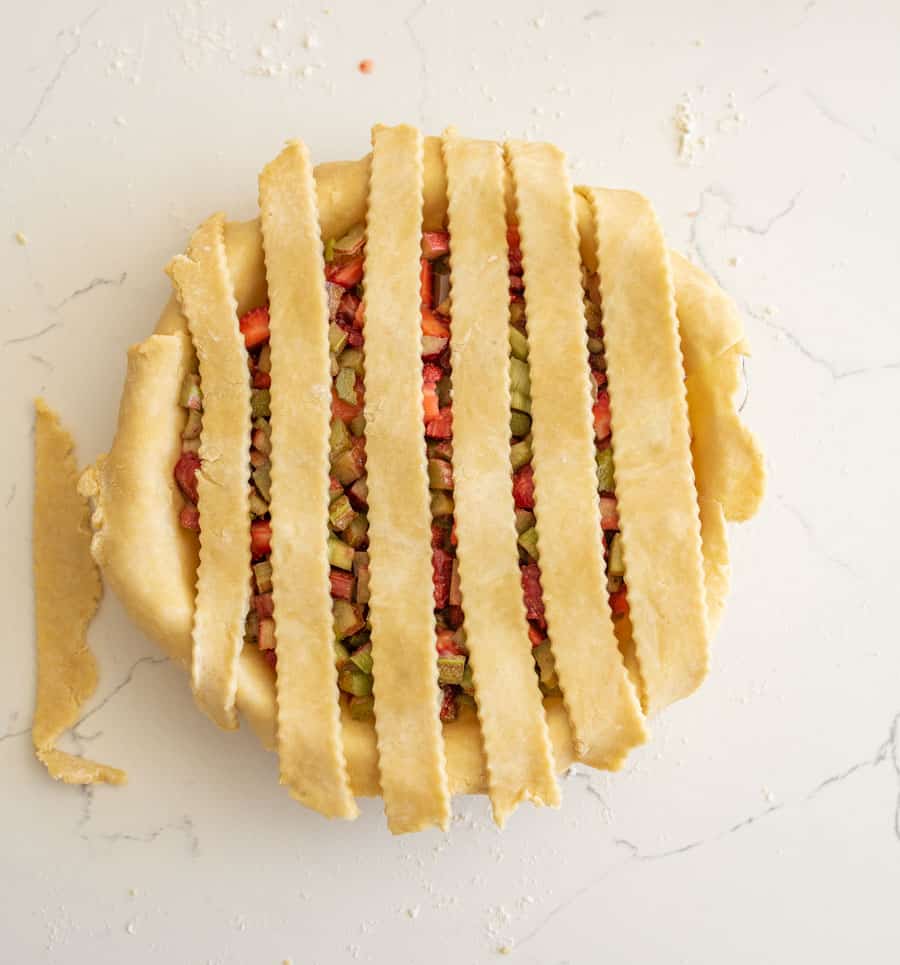
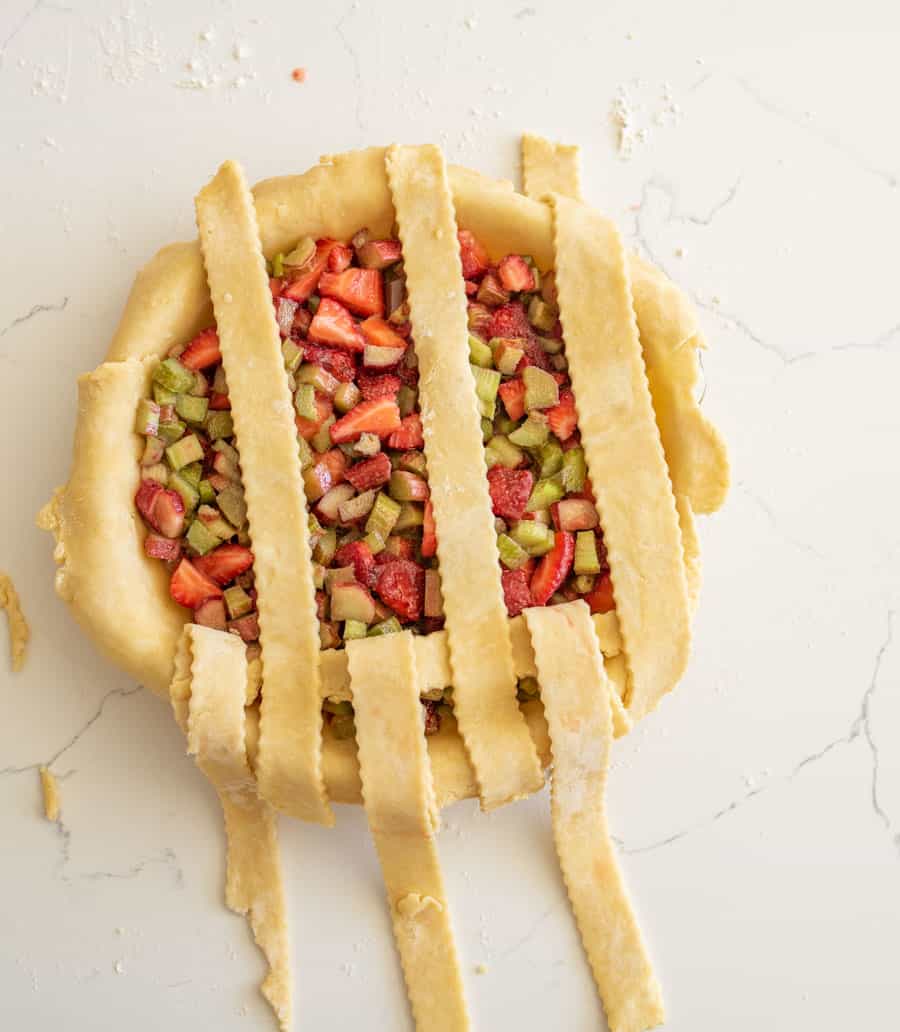
Step #14. Gently place 6 strips of pie dough evenly across the top of the pie running parallel to each other. Space the strips evenly across the top of the pie with about a 1/2-inch gap between each strip.
Step #15. Fold back 3 of the pie crust strips that you just laid on top of the pie, alternating pieces so that every other one is folded back.
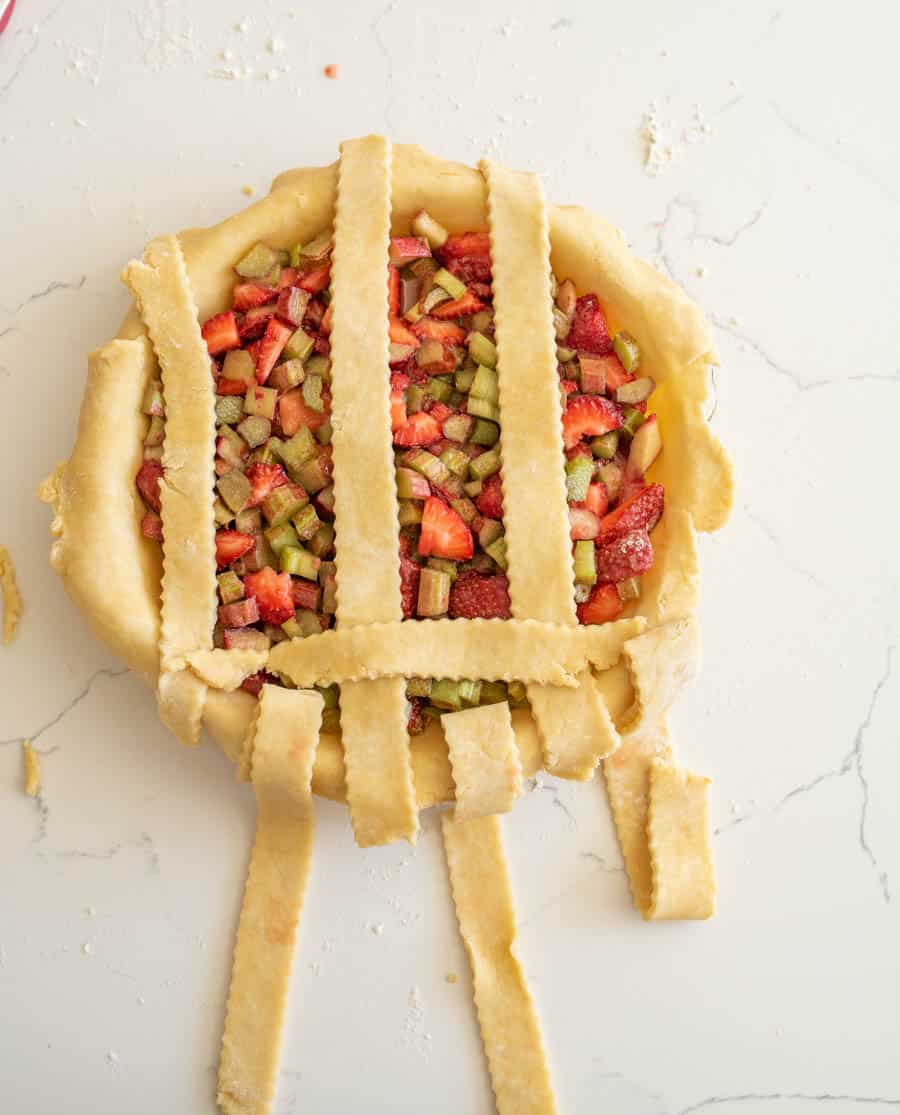
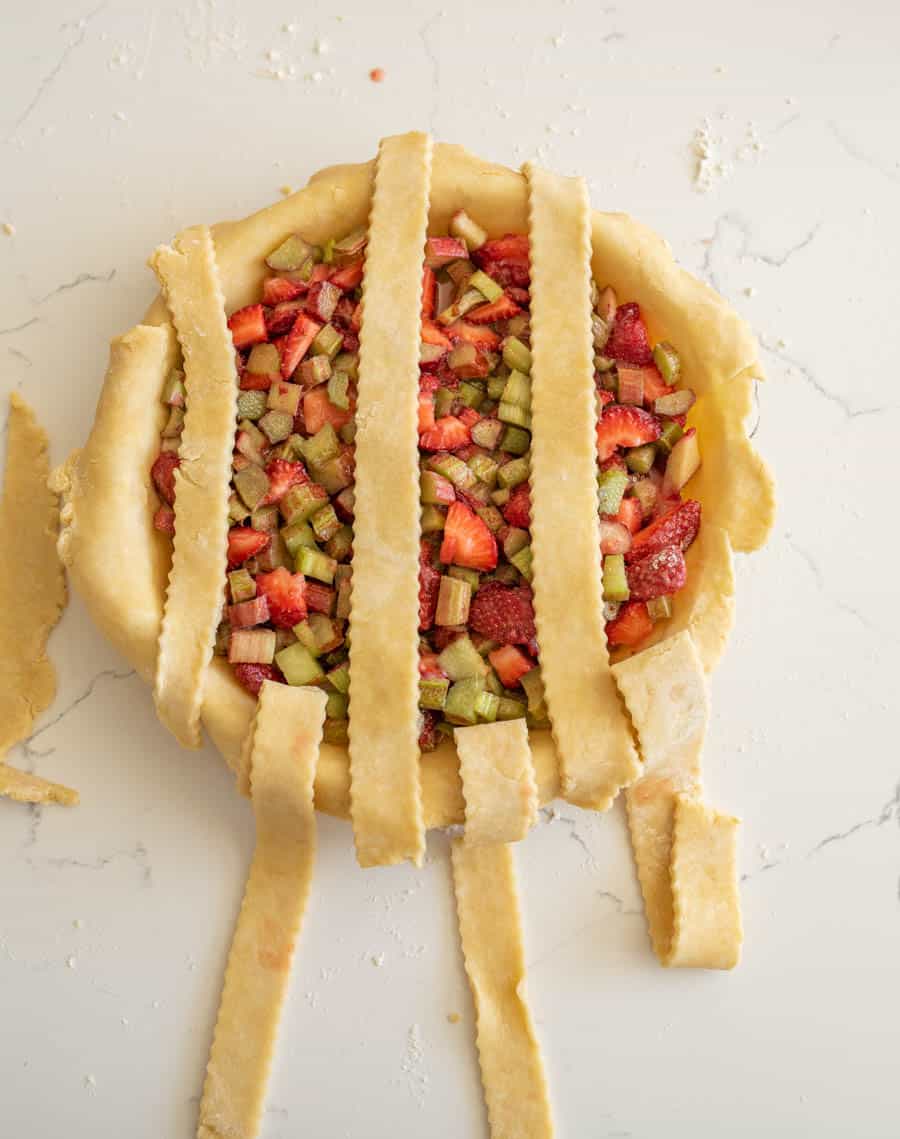
Step #16. Place a short crust strip near the edge of the pie (perpendicular to the ones you’ve already placed on the pie) on top of the strips that you have not folded back.
Step #17. Unfold the strips that are folded and rest them back on top of the pie. You’ve now done your first piece of lattice. The perpendicular strip will now be on top of 3 of the strips and under 3 of the strips.
Step #18. Fold back the opposite 3 strips as last time and place a second strip of dough about 1/2 inch from the first perpendicular piece you set down.
Step #19. Unfold the pie strips and gently rest them on top of the pie. You’ve now completed your second row of lattice work.
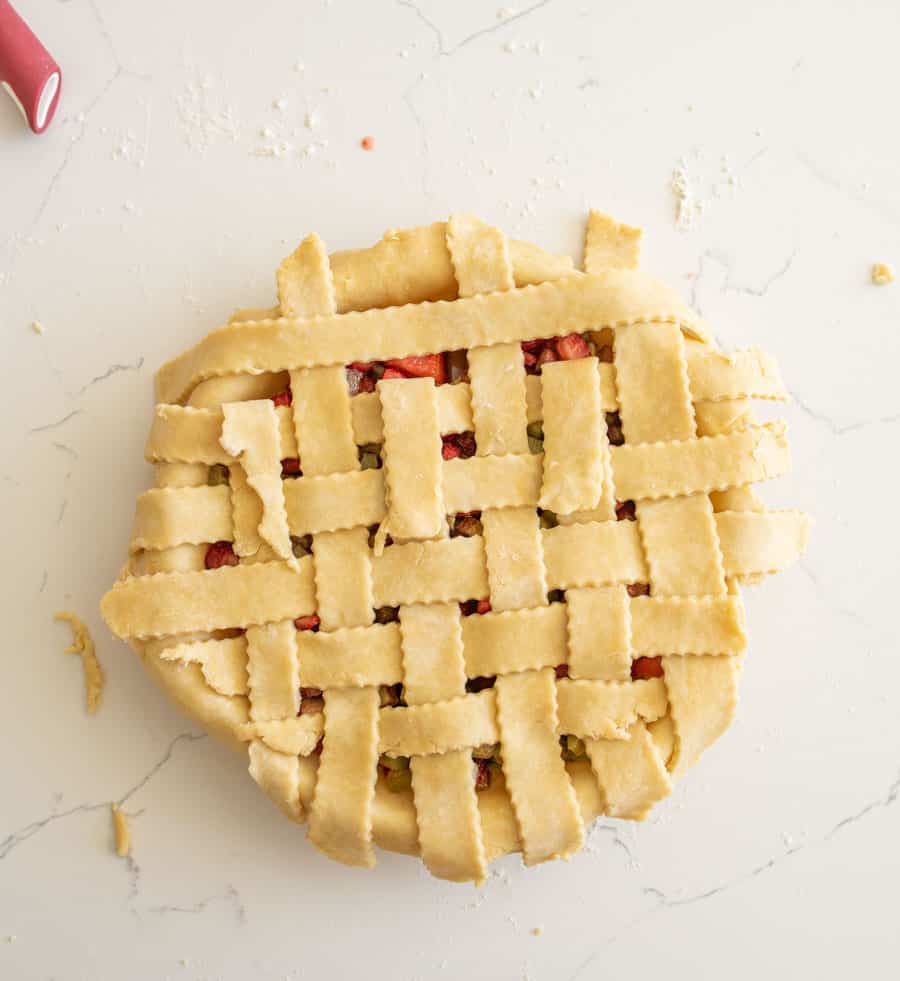
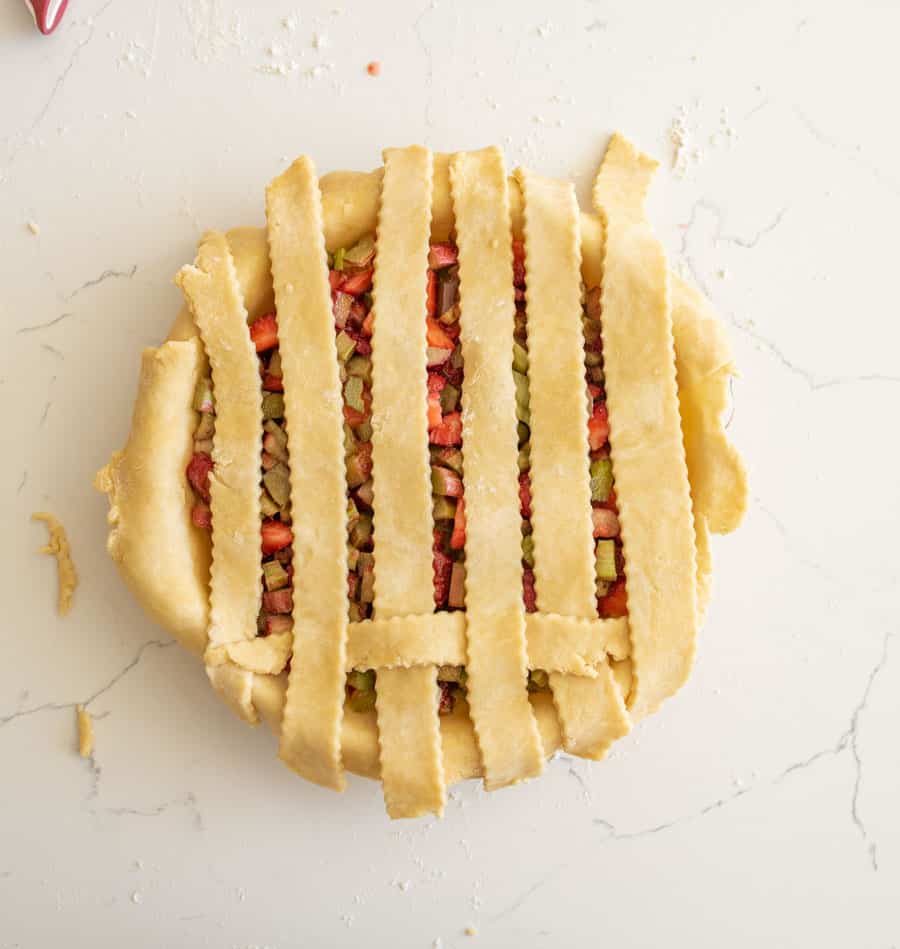
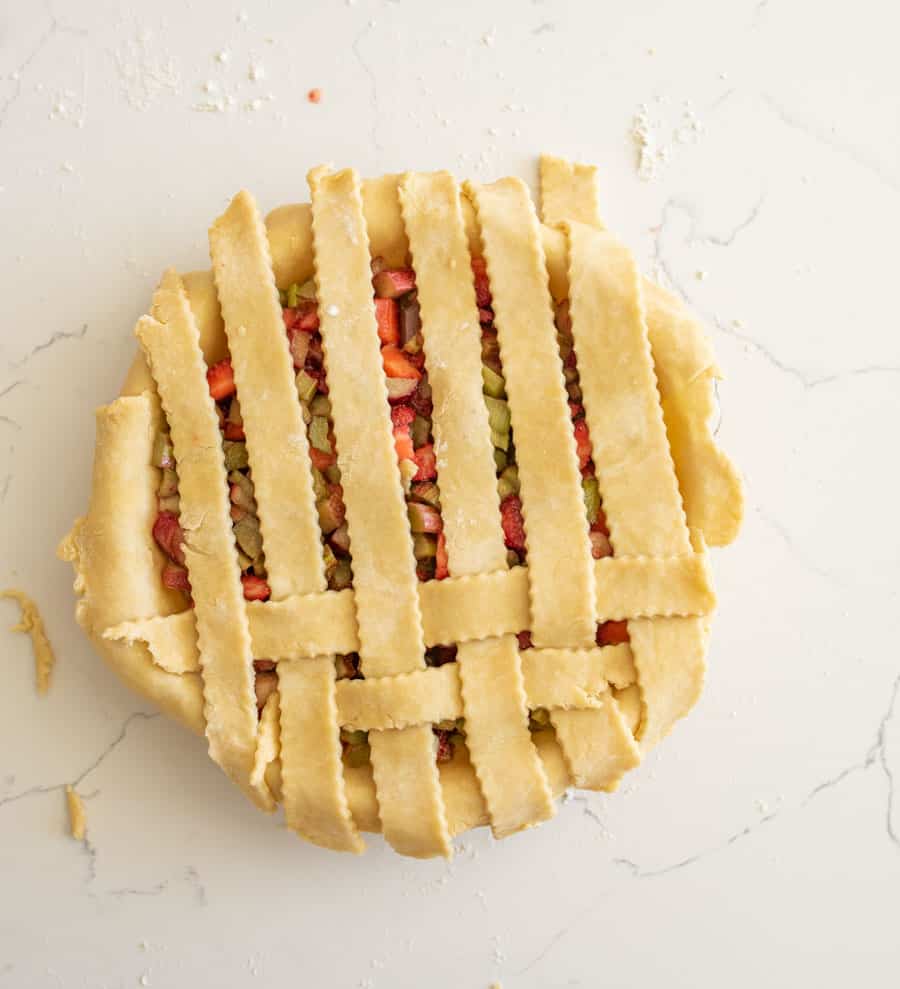
Step #20. Repeat this folding back 3 and laying down a new strip of pie crust (alternating which 3 you are folding back) until you’ve worked your way across the pie and added 6 perpendicular strips to the pie top.

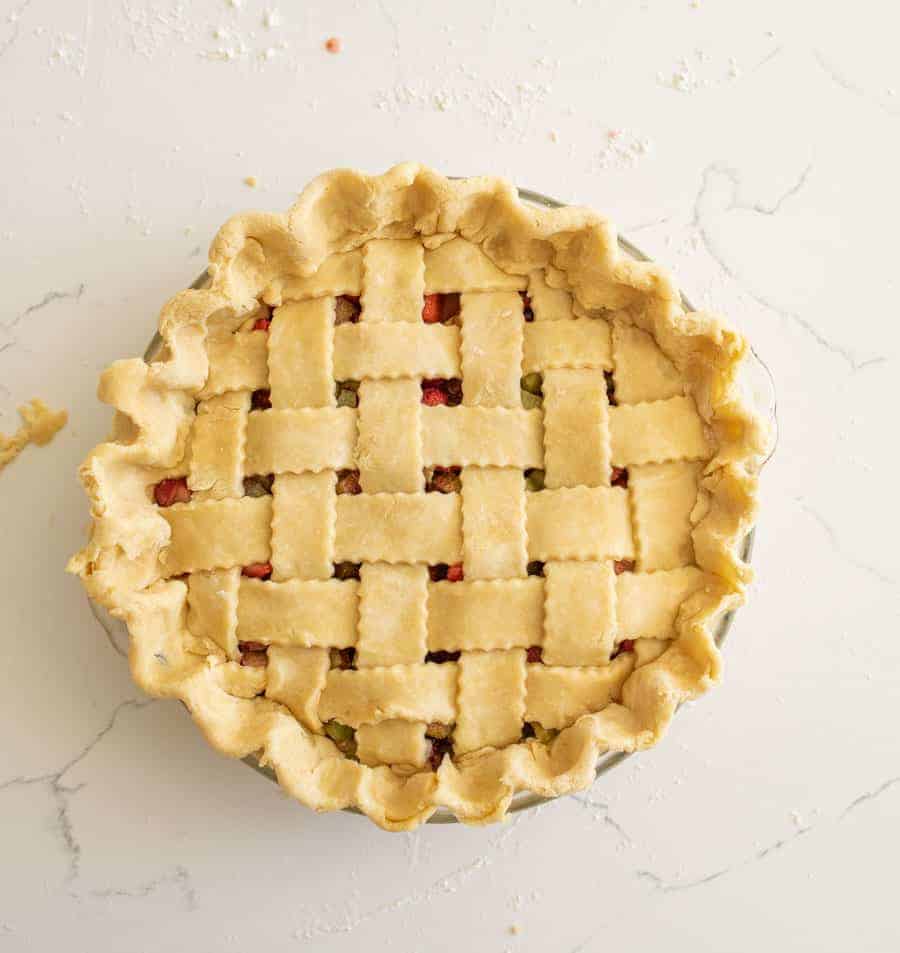
Step #21. Once all 12 strips of your lattice have been added, use scissors or a sharp knife to trim any dough that is hanging past the rim of the pie pan more than 1 inch.
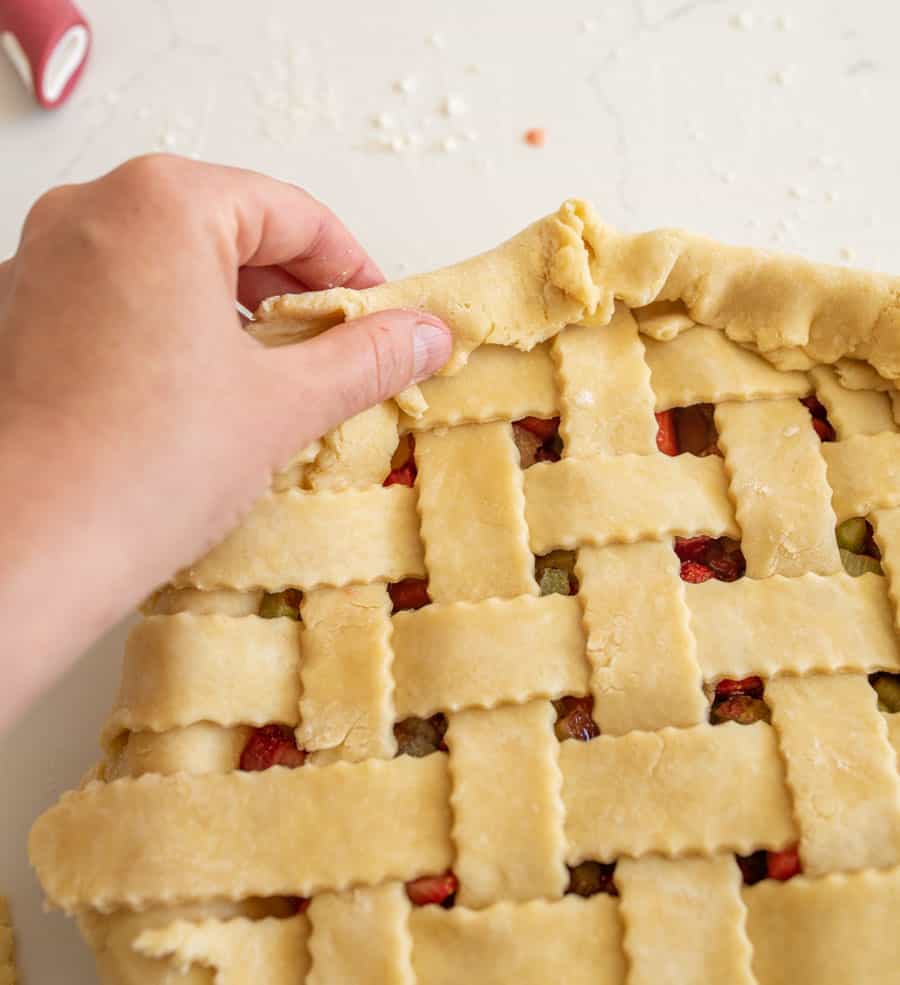
Step #22. Fold the bottom pie crust up and towards the pie center evenly around the whole edge of the pie to give it a clean look.
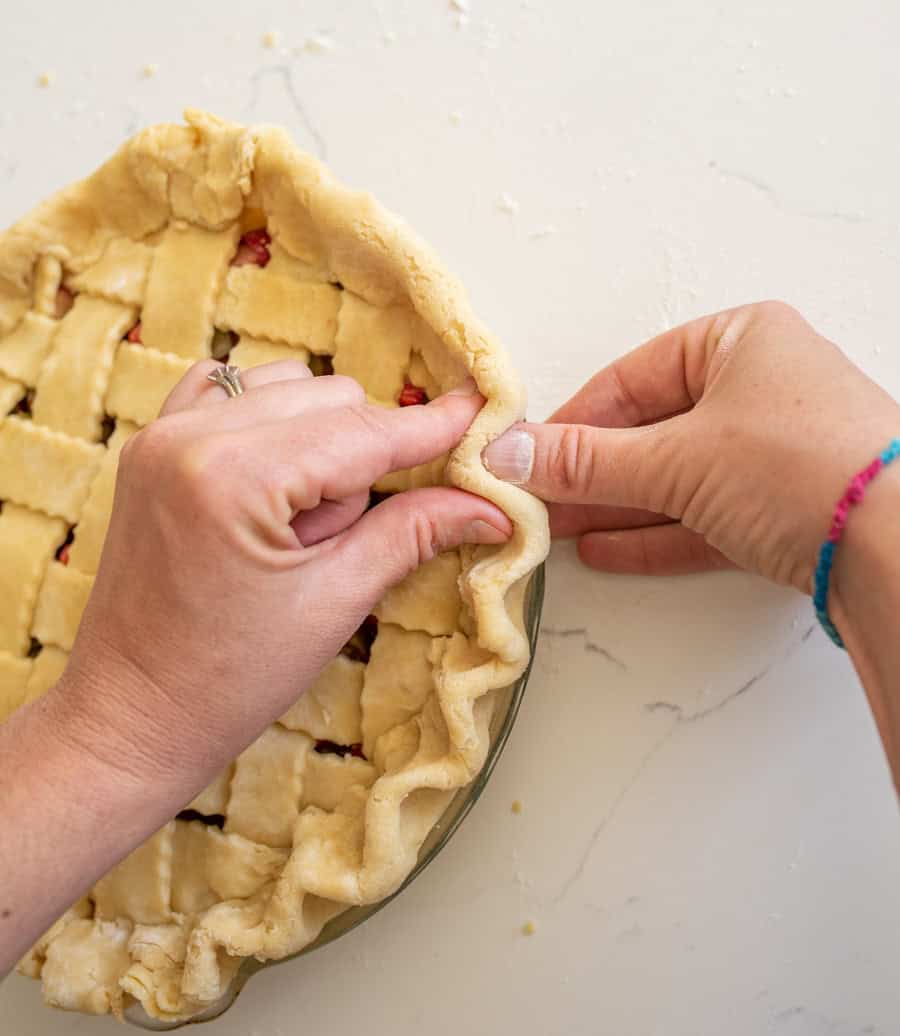
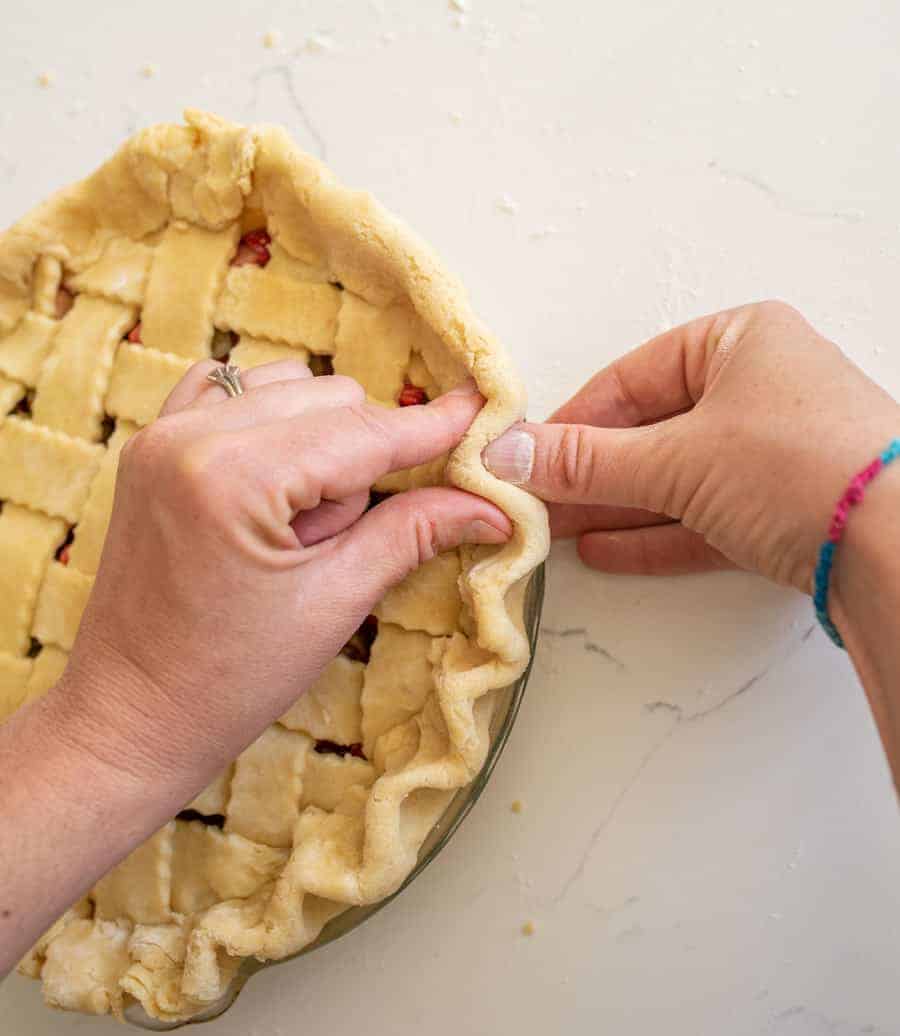
Step #23. Use your pointer finger and thumb from one hand and your thumb from the other hand to press and seal the pie crust. Do this evenly around the edge of the pie.

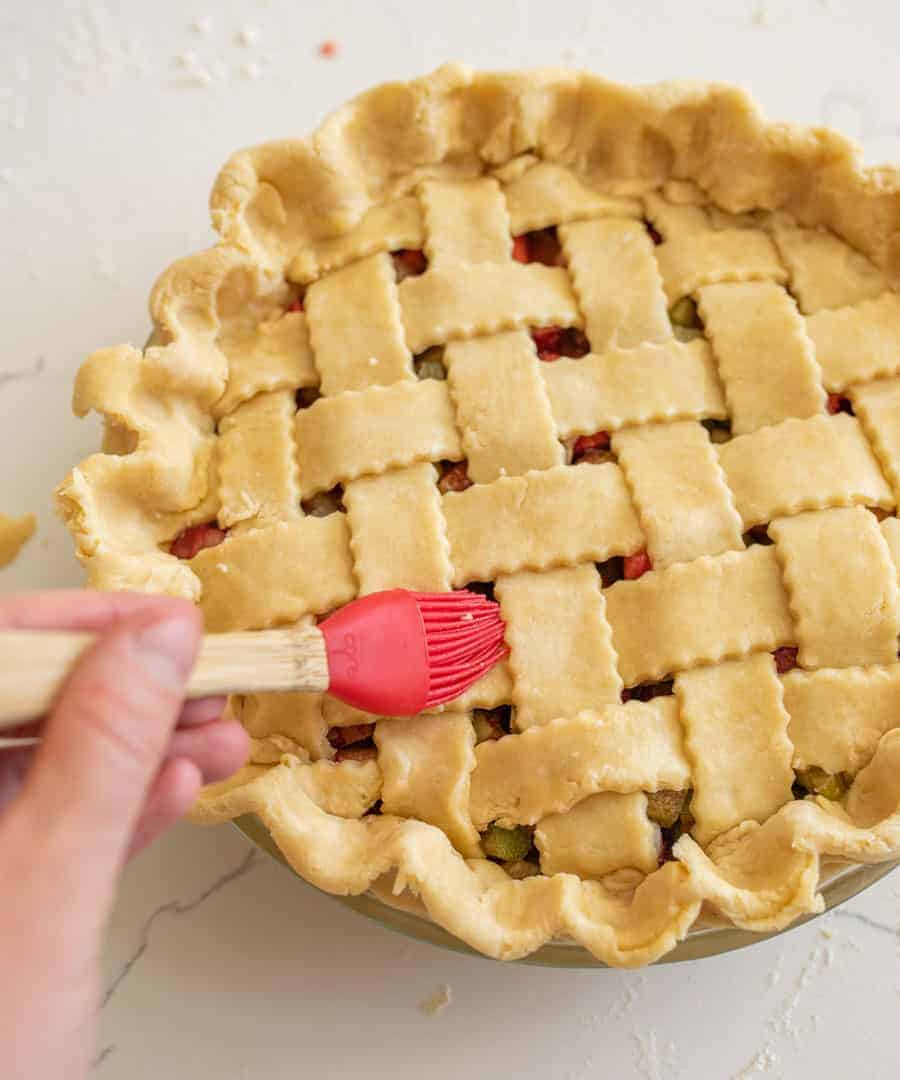
Step #24. Brush your finished lattice pie crust with water and sprinkle it with white sugar to give it a pretty finish. Then, continue to follow the directions on your pie recipe for baking.
Recipe FAQs
Make sure to press the ends of the strips firmly into the edge of the pie crust to ensure it stays put while baking.
You can prevent the lattice crust from burning while baking the pie by covering it loosely with aluminum foil (or a pie crust cover if you have one) halfway through baking.
The combination of shortening and butter in this pie crust recipe helps create a flaky and tender crust texture.
Expert Tips
- When placing the crust strips, make sure they reach from one side of the pie crust to the other.
- You’ll have some shorter strips of pie dough because you cut a circle, so use the shorter strips on the edges of the pie and use the longest strips in the center of the pie.
- Brushing your finished lattice pie crust with water and sprinkling it with white sugar is a beautiful way to finish a lattice pie crust.
- Be sure that the butter and water you use is cold or your crust will not have a flaky texture when baked.
- To get even strips for the lattice, use a ruler or straight edge and a pizza cutter to guide your cuts and spacing.
More Dessert Recipes to Consider

From Scratch Recipes
Easy Monster Cookies Recipe (Thick & Chewy)

From Scratch Recipes
Best Fudgy Carmelitas Cookie Bars

From Scratch Recipes
Simple Homemade Creme Brulee Recipe
From Scratch Recipes
Easy Homemade Nutter Butter Cookies
Did you make this recipe? Leave a ⭐️ review and share it on Instagram, Facebook, or Pinterest!
How to Make a Lattice Pie Crust
Ingredients
- 2 1/2 cups all-purpose flour
- 1 teaspoon salt
- 3/4 cup shortening
- 6 tablespoons cold butter
- 1/2 cup ice-cold water
Instructions
Steps for making the pie dough:
- Measure the flour by scooping it in your measuring cup, and leveling off the top with the back side of a butter knife. This will help ensure that you aren’t using too much flour.
- Place the flour and salt into a medium mixing bowl.
- Add the shortening to the bowl.
- Cut the butter into thin pieces, or you can grate it with the large holes of your cheese grater, and add to the flour.
- Use a pastry blender or a fork to combine the flour, salt, butter, and shortening. Press, or cut in, the shortening and butter until chunks about the size of peas remain.
- Add the cold water all at once, and stir to combine.
- The dough will come together nicely.
- Dump the dough out onto a lightly floured surface, and use your hands to collect it all into one ball.
- Cut the ball in half, and flatten each half into a disc.
- Wrap each disc tightly with plastic wrap.
- Store in the fridge for at least 30 minutes before using, or up to 3 days, or store in the freezer for up to 3 months. Let the dough thaw overnight in the fridge before using.
Steps for making a lattice pie top:
- Remove the chilled dough from the fridge and place it on a lightly floured surface.
- Roll out the pie crust.
- Rotate the pie crust to help roll it out evenly. Add more flour to the rolling surface and the top of the dough as needed to ensure that the pie crust doesn’t stick
- Check the size of your pie crust by placing your pie plate on top of the rolled dough to be sure that the pie crust is larger (by about 2 inches) than your pie plate.
- Remove the pie plate from the dough and gently fold the pie dough in half.
- Gently fold the pie crust in half again.
- Place the pie crust in an ungreased pie plate, stick it in the corner so that it evenly covers 1/4 of the plate so that you don’t have to move it around too much.
- Unfold the pie dough once so that it’s covering half of the pie pan.
- Unfold the pie dough fully so that it fills in the whole pie plate. Gently press the pie dough into the bottom of the pan and make sure that the edges of the dough fully cover the pie plate, pull the dough gently to adjust it.
- Fill the pie with the pie filling as called for in your recipe.
- Roll out a second pie crust on a lightly floured surface like you did the first pie crust. This pie crust needs to be about 12 inches wide.
- Cut the pie crust into 12 even strips, using a pizza cutter, pastry cutter, or sharp knife. The strips should be about 1 inch wide.
- Gently place 6 strips of pie dough evenly across the top of the pie – all running parallel to each other. Ensure that the strips are spaced evenly across the top of the pie, there should be about a 1/2 inch gap between each strip. You’ll have some shorter strips of pie dough because you cut a circle, so use those shorter strips on the edges of the pie and use the longest strips in the center of the pie. Make sure the crust strips reach from one side of the pie crust to the other. Fold back 3 of the pie crust strips that you just laid on top of the pie, alternating pieces so that every other one is folded back.
- Place a short crust strip near the edge of the pie – perpendicular to the ones you’ve already placed on the pie. Place the strip on top of the strips that you have not folded back.
- Unfold the strips that are folded and rest them back on top of the pie. You’ve now done your first piece of lattice. The perpendicular strip will now be on top of 3 of the strips and under 3 of the strips.
- Fold back the opposite 3 strips as last time and place a second strip of dough about 1/2 inch from the first perpendicular piece you set down. Unfold the pie strips and gently rest them on top of the pie. You’ve now completed your second row of lattice work. Repeat this folding back 3 and laying down a new strip of pie crust (alternating which 3 you are folding back) until you’ve worked your way across the pie and added 6 perpendicular strips to the pie top.
- Once all 12 strips of your lattice has been added you are ready to trim the edges. Use scissors or a sharp knife to trim any dough that is hanging past the rim of the pie pan more than 1 inch.
- Fold the dough outside of the rim towards the center of the pie so that the bottom pie crusts folds up and over the strips of lattice. It gives the pie a cleaner look. Fold the bottom pie crust up and towards the pie center evenly around the whole edge of the pie.
- Use your pointer finger and thumb from one hand and your thumb from the other hand to press and seal the pie crust. Do this evenly around the edge of the pie.
- You’ve successfully made a lattice pie crust! Continue to follow the directions on the pie recipe below for finishing and baking. I’ll often brush the top of my pies with water and then give them a good sprinkling of sparkling sugar. It makes for really pretty baked pie.
Notes
- Be sure that the butter and the water are cold when you prepare the pie crust.
- Using a pizza cutter or pastry cutter with a ruler or straight edge is an easy way to keep the strips consistent.
- When sealing the piece crust edge, be sure to use firm pressure to keep the lattice top secure while baking.
- You can use these lattice crust instructions here with any pie crust recipe that you prefer.
Nutrition
I hope these step-by-step instructions helped you to visually see just how easy it is to lattice a pie crust. Once you’ve seen it and done it once, it’s much easier to make a pretty pie crust again and again.


