Family Friendly Cheese Board
on Jun 23, 2021
This post may contain affiliate links. Please read our disclosure policy.

Here’s a full guide on how to make a family-friendly and party ready cheese board for all of your picnics, parties, and gatherings this summer. A cheese board doesn’t have to be expensive, stuffy, or fussy and I’m here to show you how to make a cheese board that’s perfect for everyone at the gathering, kids and non-gluten eaters alike!
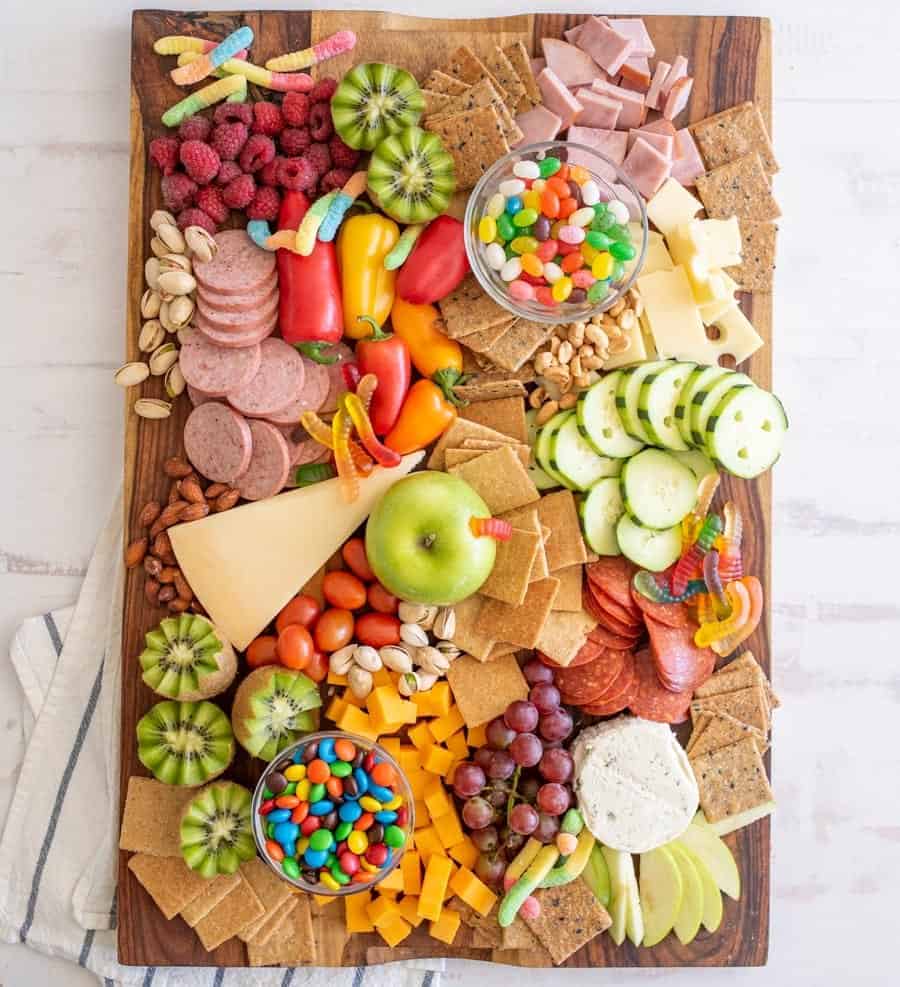
Table of Contents
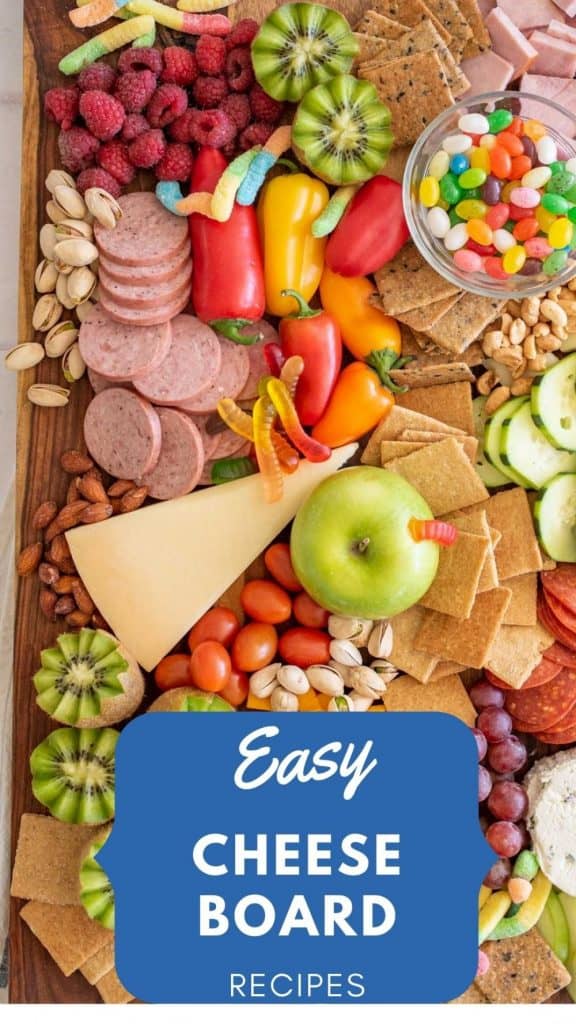
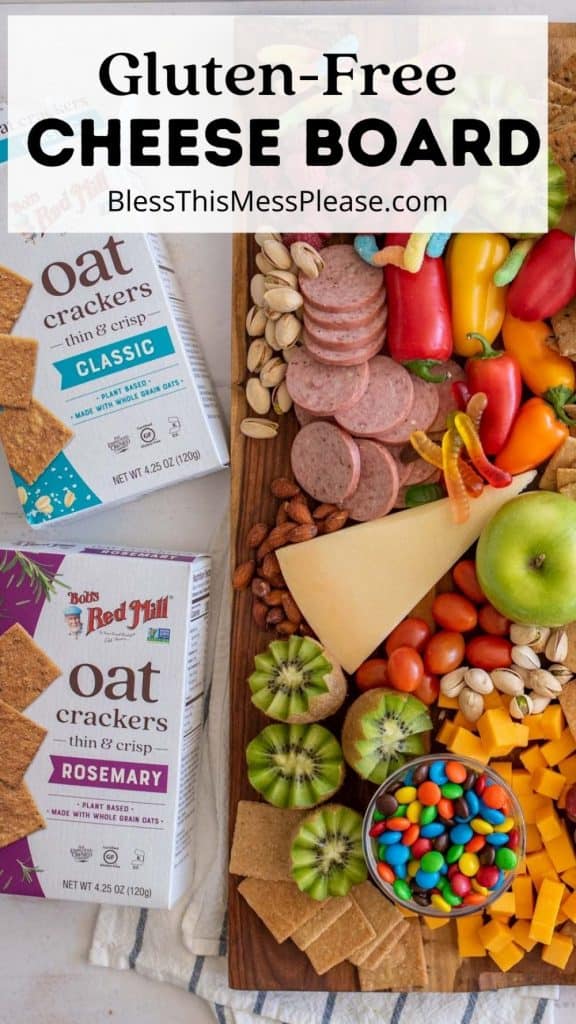
Easy Meat and Cheese Board
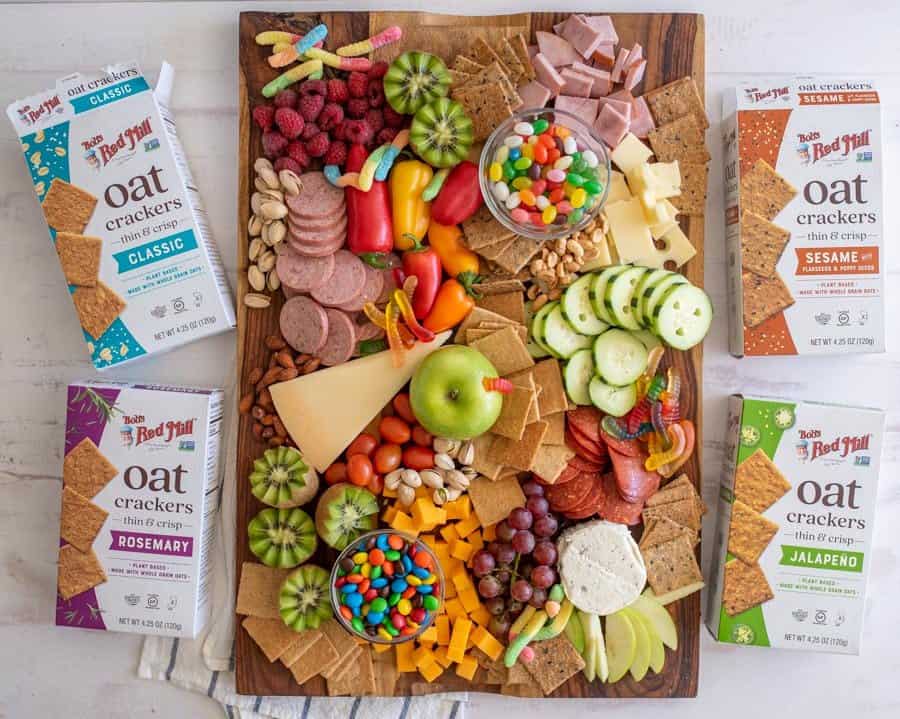
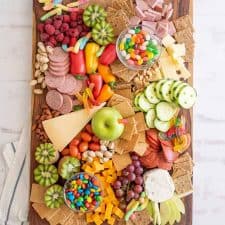
I’m here to tell you that making a cheeseboard doesn’t need to be fancy, fussy, or overly expensive to be a delicious meat and cheese board to snack on. I love making a family friendly cheese board for an easy meal, to take to a party or get together, or to make a movie night in extra special.
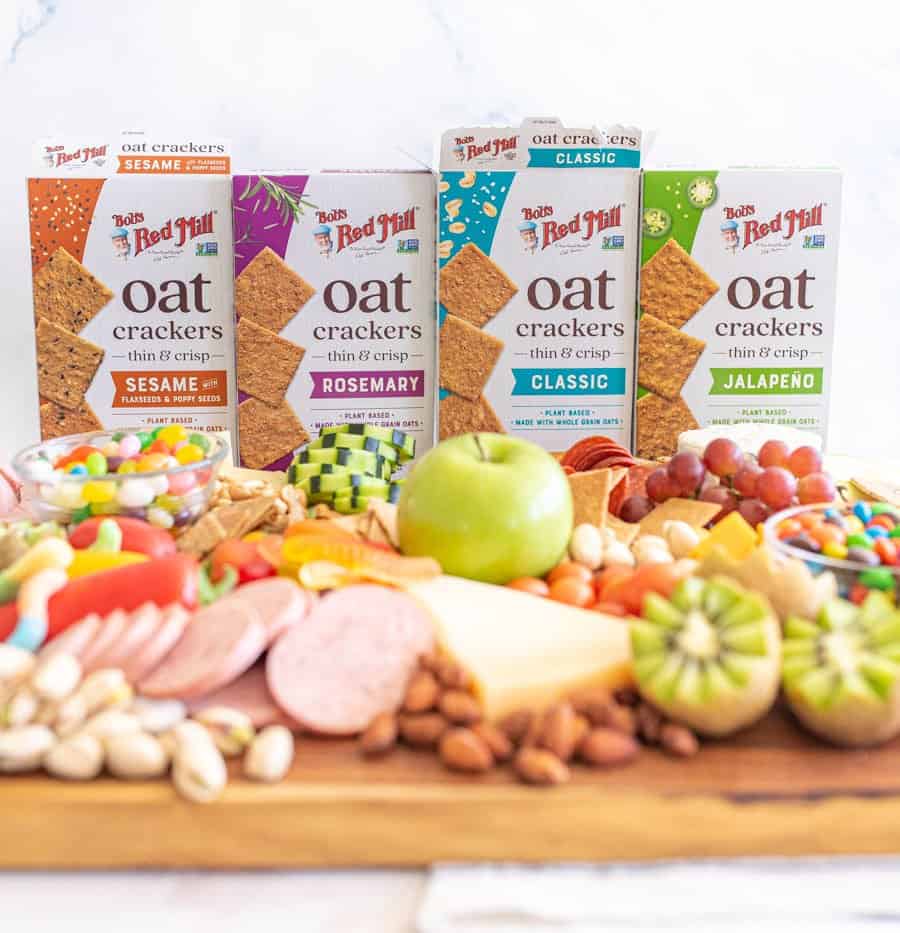
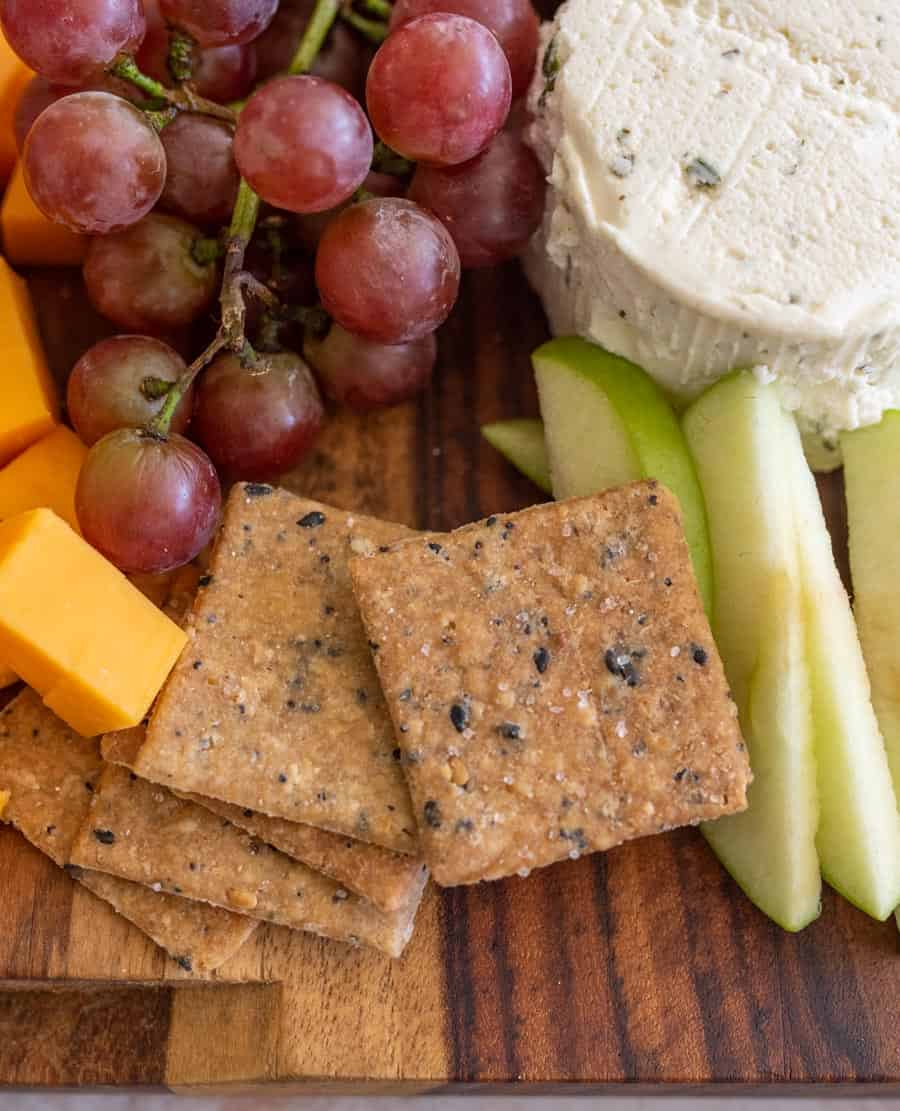
Today I’m working with Bob’s Red Mill and sharing their new Oat Crackers with you! It was so fun to try this new product and highlight them here. I always keep gluten free crackers on hand for friends and family who need to eat gluten free, but truth be told, my kids and I totally loved these regardless of their gluten status.
They are super crisp and perfectly salted. The jalapeno variety was actually the big favorite, the heat is just right and it was perfect with some cheese and a crispy sweet apple slice on top. I’m definitely getting them again! The second favorite was the sesame that also has flaxseeds and poppy seeds in it. I loved the look of it, perfect for a pretty board (and of course they were crispy and delicious).
Here are all of my tips and tricks for making an epic (but not fussy) cheese board at home.
What to put on your cheese board:
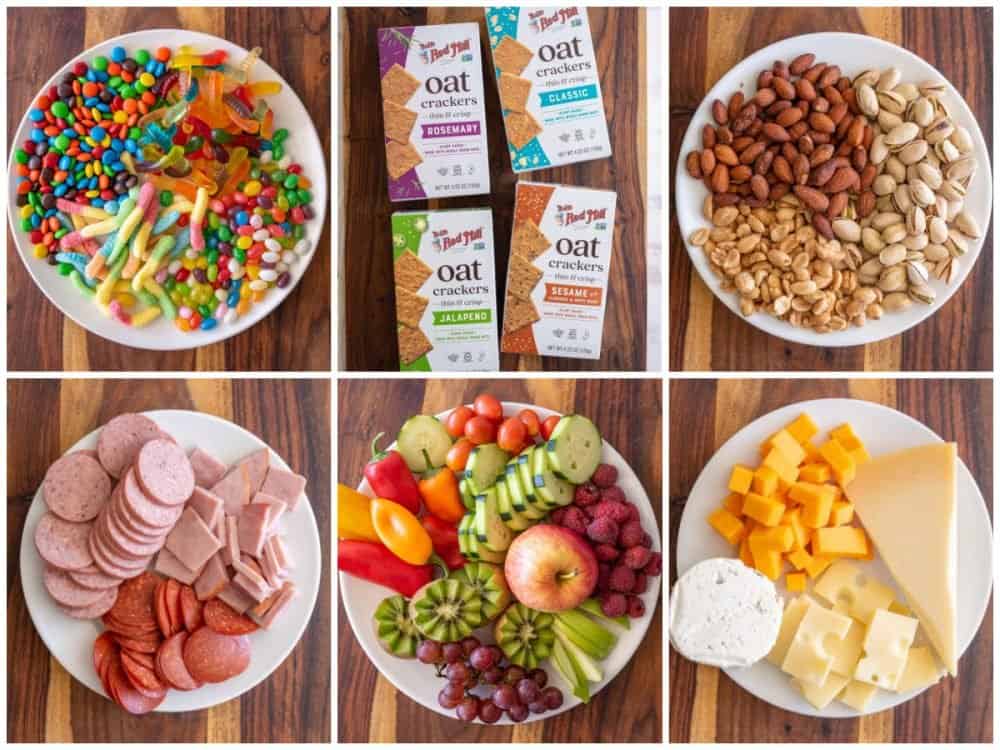
- Pick 3-4 simple cheeses: think cheddar, swiss, and pepper-jack. You can add Parmesan, simple goat cheeses, or something like an herb and garlic cheese as well. No need to pick cheeses you don’t know, just cut the usual cheeses into different shapes or serve them whole (like the parmesan).
- Pick 3-4 fruits and 3-4 vegetables: this helps to fill in the board, is a familiar option for kids, and they look pretty. Pick fruits and vegetables that are in season and pick ones that are different colors from the others. Apples and grapes are staples and go well with the cheeses.
- Pick 2-3 simple meats: sticking with the theme of simple go for cubed ham, pepperoni, and summer sausage.
- Go for gluten-free crackers: when I’m taking a board like this to a party I always load it up with gluten free crackers (and check the cheese/meats) so that everyone can enjoy the spread! I love Bob’s Red Mill new Oat Crackers. Highly recommend.
- Add fun extras like candy and nuts: I pick bright candies that don’t melt so that the board can be eaten outside at a picnic.
How to lay everything out on your meat and cheese board:
- Start by adding the meats and cheeses to the board since they take up quite a bit of room. I like to clump them together by the type of meat or cheese but don’t feel like you have to keep things from touching.
- Add your fruits and veggies next.
- Add the crackers in the main spaces remaining.
- Put the candy and nuts in little dishes and/or in the few smaller spots left, these are kind of your garnish, so use them to make the board look full.
Tips and tricks:
- If you are planning on taking the board with you some where you can get your board all ready, right before leaving, and them wrap it up well in plastic wrap and travel with it.
- If you are traveling farther than that you can cut up your meat, cheese, fruits, and veggies ahead of time and just keep them in containers and assemble on site. This is normally what I do.
- Don’t feel obligated to buy fancy meats and cheese you don’t know if you like, are super expensive, or you can’t even pronounce, especially if you are taking the board to a party. People love the look of a cheeseboard and most appreciate eating things they already know they like. Save the fancy cheeses for a smaller board at home where you can experiment a little more.
- Add variety and interest by cutting things into different shapes and in fun ways and by varying the colors. If you picked a red apple, get green grapes. Variety is really what makes the presentation pop.
- I use cutting boards for my cheese boards! I have a variety of boards that I’ve gotten on Etsy, had locally made, or bought at Ross or Home Goods. I use them as cutting boards, serving trays, and cooling racks for hot pans when they aren’t being used as cheeseboards so I don’t mind keeping them on hand.
More Cheeseboard Recipes:
- Everyday Cheese Board
- Easy Fall Apple and Cheese Board
- My Favorite Classic Cheese Board
- Halloween Cheese Board
- DIY Christmas Cheese Board for a Party
- Valentine’s Chocolate and Cheese Board
If you’ve tried this easy cheese and meat board recipe or any other recipe on Bless this Mess, then don’t forget to rate the recipe and leave me a comment below! I would love to hear about your experience making it. And if you snapped some pictures of it, share it with me on Instagram so I can repost on my stories AND add your photo to your comment so that other can see your creation.
Family Friendly Cheese Board
Ingredients
- 3-4 simple cheeses: think cheddar, swiss, and pepper-jack. You can add Parmesan, simple goat cheeses, or something like an herb and garlic cheese as well.
- 3-4 fruits and 3-4 vegetables: this helps to fill in the board, apples and grapes are staples and go well with the cheeses.
- 2-3 simple meats: go for cubed ham, pepperoni, and summer sausage.
- Gluten-free crackers: I love Bob's Red Mill new Oat Crackers. Highly recommend.
- Add fun extras like candy and nuts: pick things that won't melt if taking to a party like gummies or jelly beans
Instructions
- Find a nice large cutting board or a pretty rimmed baking sheet.
- Start by adding the meats and cheeses to the board since they take up quite a bit of room. I like to clump them together by the type of meat or cheese but don’t feel like you have to keep things from touching.
- Add your fruits and veggies next.
- Add the crackers in the main spaces remaining.
- Put the candy and nuts in little dishes and/or in the few smaller spots left, these are kind of your garnish, so use them to make the board look full.
- Serve right away or wrap well and stick in the fridge until you are ready to party (can be made a few hours ahead of time. If you need to make it farther ahead of time don’t add the crackers until you are ready to serve so that they don’t get stale).
Notes
- You can’t mess this up! One key is to let the board look full so don’t try to keep things from touching. Add your favorites, what you have on hand, what you like, things cut into different shapes (don’t cut all the cheese the same way), and add things with interesting colors and textures. You can do it!!
Nutrition
Disclosure: this post was sponsored by Bob’s Red Mill and is part of my on going relationship with them. I love working with them and use their products daily in my kitchen. Thank you for supporting the brands that make Bless this Mess possible.
And there you have it! One very simple, less expensive, not fussy cheeseboard recipe that the whole family will love and if you take it to a party, it’ll be the star of the show. Bonus: keeping it gluten free makes it so that everyone can enjoy it!