This post may contain affiliate links. Please read our disclosure policy.
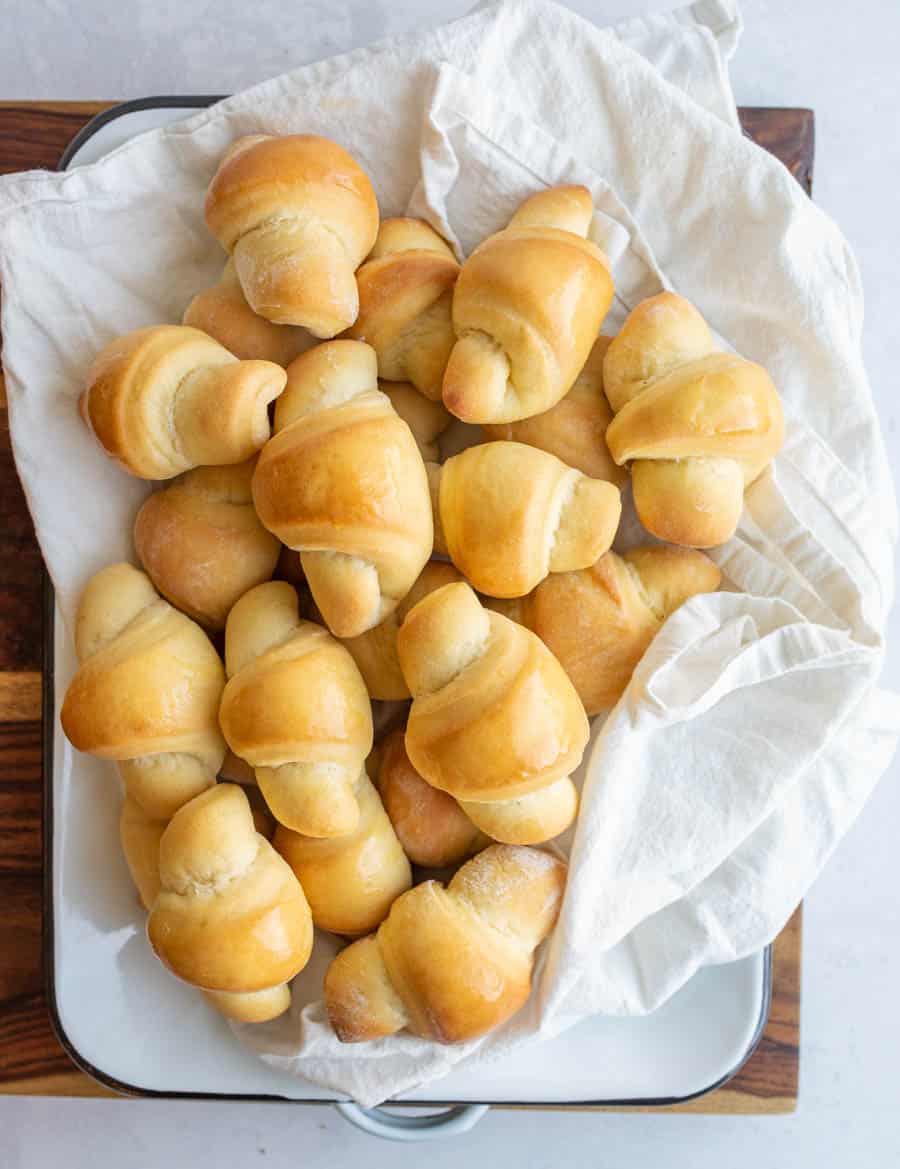
Looking for an overnight dinner roll recipe? We’ll this is it! This is the perfect option for mixing up your dough the day before, putting it in the fridge to rise overnight, then shaping, rising again, and baking the next day.

Looking for a way to get some of your dinner prep done ahead of time (especially when it comes to big busy meals like Thanksgiving, Christmas, and Easter)? Look no further! These overnight dinner rolls are a perfect make-ahead recipe holidays and they turn out amazing.
Light and fluffy rolls are the things family dinner memories are made of. These rolls will not disappoint in that department.
Table of Contents

Why You’ll Love This Recipe
- They’re so convenient! Whether you want rolls for a holiday dinner or just want easy prep for a busy day meal, these cut down on the hands on time you need that day.
- This is a great beginner-friendly bread recipe!
- There’s just something about freshly baked rolls – everyone loves them!
Ingredients in Overnight Dinner Rolls
- Yeast: you can use rapid, instant, or active dry yeast
- Flour: we’re using all-purpose flour here, no specialty flours needed
- Butter
- Eggs
- Sugar
See the recipe card below for full information on ingredients and quantities
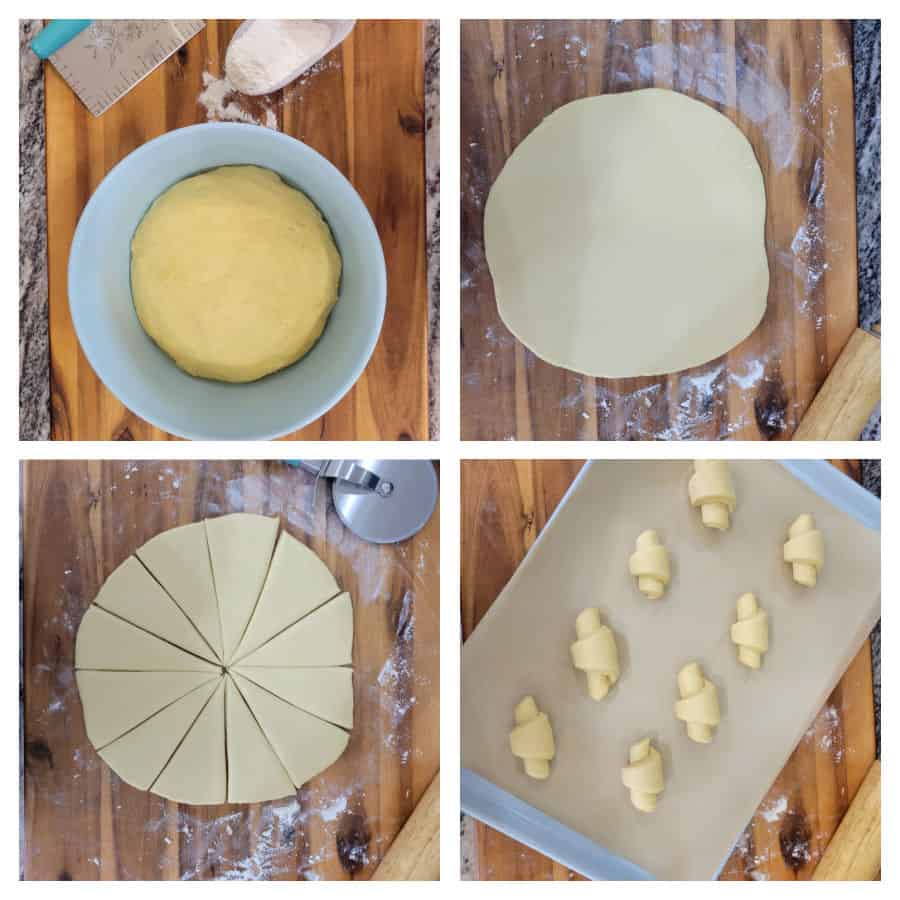
How to Make Overnight Dinner Rolls
Step #1. The first day, make the dough. Store it in an airtight bowl or container in the refrigerator for 6-18 hours.
Step #3. Let the rolls rise until doubled in size.
Step #2. The next day, remove the bowl of dough from the fridge. Shape the rolls as desired.
Step #4. Bake the rolls according the directions below. Enjoy them warm!
Recipe FAQs
Normal rolls with traditional yeast will “over proof” if you let them rise that long at room temperature. (The yeast will exhaust itself and then the rolls will fall when baking and be flat.) The key is to let the dough chill overnight in the refrigerator and then shape the rolls and bake them the next day.
Yes with this recipe! That overnight chill in the fridge is what allows you to get perfect rolls the next day and it saves a lot of time on busy cooking day.
Yes, you can use rapid, instant, or active dry yeast for this recipe. This isn’t a recipe for natural yeast or sourdough though.
Expert Tips
- Be sure to scoop the flour and dump it into your measuring cup, rather than using your measuring cup to scoop. If you scoop with the measuring cup, you’ll be far more likely to have too much flour which will make your dough too stiff and your rolls lose their much of their fluffiness.
- Try to keep your rolls the same size so that they bake evenly.
- Make sure to use lukewarm water. If it is too hot, it will kill the yeast and your dough won’t rise like it should.
- The shape of these rolls makes them easy to customize. You can roll up different cheeses or meats inside the crescent or brush them with garlic butter – really anything you can come up with!

More Roll Recipes to Consider
Yeast Bread Recipes
Garlic & Parmesan Italian Breadsticks {Twisted Breadsticks}
Yeast Bread Recipes
Bread Bowls
Roll Recipes
Easy Croissant Recipe
Sweet Treats
Hot Cross Buns
Did you make this recipe? Leave a ⭐️ review and share it on Instagram, Facebook, or Pinterest!

Fluffy Overnight Dinner Rolls
Ingredients
- 1 package active dry yeast, (2 1/4 teaspoons)
- 1 1/4 cups warm water, (around 105 degrees F.)
- 4 to 4 1/2 cups all-purpose flour
- 1/3 cup sugar
- 1/3 cup melted butter
- 1 large egg
- 1 teaspoon salt
- additional 4 tablespoons melted butter
Instructions
- In a large bowl add the yeast and warm water and stir to combine.
- Add 1 1/2 cups of the flour, sugar, the 1/3 cup melted butter, egg, and salt and stir well to combine.
- Mix together for 1 minute (you can make these by hand or use a stand mixer).
- Add enough of the remaining flour, 1/2 cup at a time and stirring well after each addition, until it forms a soft and slightly sticky dough that starts to pull away from the side of the bowl.
- Place the dough in a well greased 3 quart container and flip it over once so that the top of the dough is also greased.
- Cover the container tightly and place it in the fridge overnight.
- When you are ready to make your rolls the next day, take the dough out of the fridge, remove it from the container onto a lightly floured surface and cut the dough into two pieces. Cover with a clean dish towel and let rest for 10 minutes.
- Prepare 2 rimmed baking sheets by greasing them well or lining them with a baking mat.
- On a lightly floured surface, roll each dough ball into a 10 inch circle.
- Brush each circle with melted butter (use about half of the remaining 4 tablespoons, you’ll use the other half when they come out of the oven).
- Cut each circle into 12 wedges (I like to use a pizza cutter for this step).
- To shape the rolls, start at the widest part of the wedge and roll it up to the point.
- Place them with the point of the wedge down on the prepared baking sheets 3 or so inches apart.
- Cover and let rise in a warm place until the rolls nearly double in size, about 1 hour.
- Preheat the oven to 375 degrees F.
- Bake the rolls when they are done rising, one pan at a time, for 12 to 15 minutes or until golden brown.
- Brush them with additional melted butter on the tops and serve warm.
Video
Notes
- Recipe from The Better Homes and Gardens Cookbook (17th edition)
- I’ve played with the timing of this dough a little and I’ve had good luck with letting it stay in the fridge for up to 18 hours. It started to not rise as well when baked the farther from 18 hours I got. The rolls after 24 hours in the fridge were fine but they were better with shorter chilling times.
- The shape of these rolls lend themselves to customization: sprinkled with cheese, brushed with garlic butter, etc.
- Store leftover rolls in an air-tight container.
Nutrition
You’ll love all the time you’ll save on big cooking days with this overnight dinner roll recipe! Make the dough the day before, stick it in the fridge, shape the rolls and let them rise the next day. Fresh hot dinner rolls even on the busiest days.











Can you freeze these raw after they have been rolled out ?
Yep, they just take quite a long time to thaw and finish rising (like 8+ hours if your house is cool) so plan accordingly!