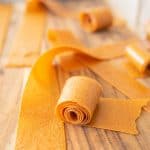
Fruit Leather
You don’t need a dehydrator for this simple fruit leather recipe, just your oven! A blender makes quick work of the pureeing and you can make just about any fruit combinations you like.
Servings: 24
Ingredients
- 4 cups ripe fruit (fresh or frozen)
- 1 tablespoon of lemon juice (fresh or bottled)
- Sugar to taste (I like to add at least 1 tablespoon for taste and up to ⅓ of a cup, depending on ripeness of fruit)
- 2 large rimmed baking sheets
- 2 baking mats or pieces of parchment paper to fit baking sheets
Instructions
- Prepare the fruit by washing it and removing any large seeds or pits (remove the seeds from pears and apples and the pits from plums, peachs, and apricots, the small seeds in berries I don’t worry about). There’s no need to remove any skins.
- Cut any larger fruit into halves or quarters to help the blender process them.
- Place the fruit and lemon juice in the jar of your blender. Blend until very smooth. If you are having trouble getting the fruit to process (it’ll depend on how moist/ripe/type of fruit), add as little water as possible to help the blender process the fruit. I’ll generally add 1 tablespoon at a time until the blender is able to work well. Often times you won’t need to add any water at all, that’s preferred as it will shorten you drying time to have less water in the fruit puree. You can also use small amounts of fruit juice to help the blender along instead of water.
- Taste the fruit leather and adjust the taste with sugar. You’ll want it to be a bit sweet but not too sweet.
- Blend in the sugar if you added any.
- Place the baking mats or parchment paper in the bottom of the baking sheets (my baking sheets are 11 by 16 inches).
- Divide the fruit mixture evenly between the two pans, pouring it into the center of the pan.
- Use a spatula (an offset metal spatula like you’d use to ice a cake works great), to evenly spread the fruit leather over the pan taking care to not touch the edges of the pan or get off of the baking mat/parchment paper. The more even you can spread it the better.
- Adjust your oven racks so that they are in the upper middle and lower middle of the oven.
- Place the prepared pans into the oven on the two racks and turn your oven on to the lowest temperature it’ll allow. Mine will let me bake at as low as 170 degrees F. The lower the better.
- Bake for 3-6 hours or until the fruit leather is no longer tacky to the touch. It’s OK to open the oven to allow some of the steam to escape occasionally and to rotate the pans in the oven to help them to cook evenly.
- Allow the pans to cool completely before removing the fruit leather from the pans and cutting into strips to store.
- If you made the fruit leather on parchment paper you can just cut the parchment paper and the fruit leather together, making homemade “fruit by the foot”. This is a great idea for sending fruit leather to school in lunch boxes or to store it for traveling as it’s less likely to stick together (and my kids love peeling it from the paper themselves). I’ll use kitchen shears to cut the fruit leather and paper into 1 inch wide strips. Then roll and store and in air-tight container.
- If you used a baking mat, simply peel the fruit leather from the mat and place it on a cutting board. Use a pizza cutter to cut it into 1 inch wide strips. Roll and place and an airtight container.
Notes
- Fruit leather is shelf stable for about a week. If you are going to store it for longer, place it in an air-tight container in the fridge for longer storage.
- If you didn’t spread the puree very evenly parts of the fruit leather will be dry while other parts are still sticky or tacky. If this has happened to you, when the majority of the fruit leather is dry you can turn off the oven and let the fruit leather rest for several hours or overnight. This will give the rest time to dry in a warm oven while preventing the dry part from over drying and becoming brittle like fruit chips.
- You can for sure make this recipe with a dehydrator and dehydrator trays, just take a look at the instructions that came with your dehydrator on the best timing and settings for fruit leather but this recipe will definitely work for it too.
Nutrition
Serving: 1 of 24 rolls | Calories: 13kcal | Carbohydrates: 3g | Protein: 0.1g | Fat: 0.04g | Saturated Fat: 0.01g | Polyunsaturated Fat: 0.01g | Monounsaturated Fat: 0.002g | Sodium: 0.2mg | Potassium: 23mg | Fiber: 1g | Sugar: 3g | Vitamin A: 11IU | Vitamin C: 1mg | Calcium: 1mg | Iron: 0.03mg