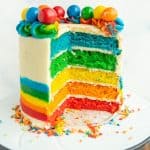
Rainbow Cake
The most beautiful layered rainbow cake with colored cake and perfect rainbow decorations that will bring sunshine to any celebration or party. And the best part is it's extra easy because you start with a box of cake mix!
Servings: 12 -16 servings
Ingredients
For the Cakes
- 2 boxed white cake mixes (around 15 ounces each)
- water
- oil
- eggs
- gel food coloring
For the Frosting
- 1 ½ cups unsalted butter at room temperature
- 4 ounces cream cheese (½ block), at room temperature
- 8 cups powdered sugar (a 2 pound bag)
- 2-4 tablespoons heavy cream
- 2 teaspoons vanilla
- Pinch of salt
Instructions
To Make the Cakes
- Spray the bottom of 6 inch cake pans with baking spray (I only have 3 pan so I worked in batches, it generally works better for space in the oven too). If you don’t have baking spray, you can butter the pans very well and dust the inside of the pans with flour.
- Make the first box cake mix according to the package directions and divide the batter evenly into 3 bowls.
- Color one bowl red, one yellow, and the last orange. The gel food coloring should have some indication on how much to use, but the batter should be very bold in color.
- Bake according to directions on the box. You’ll know that the cakes are done when they spring back when lightly touched. If you lightly poke them and it leaves an indent in the cake, bake it a few minutes longer.
- Allow the cakes to cool on a wire rack for 5 minutes before removing it carefully from the pan. I like to place a cooling rack on top of my slightly cooled cake and then flip it over with the cooling rack on top (so that the rack is now on the bottom), then remove the pan and allow the cake to continue to cool on the rack.
- Once the pans have cooled, wipe them clean and spray them with baking spray or grease and flour them well.
- Make the second box cake mix and again divide batter into 3 bowls.
- Color one green, one blue, and the last purple. (I decided last minute that I didn’t want to use purple, so I left that layer out and did not add purple to the outside of the cake at all. You can for sure work with 6 layers and purple on the outside too, 5 worked just as well).
- Bake according to directions on the box.
- Allow the cakes to cool on a wire rack for 5 minutes before removing it carefully from the pan. Allow all of the cakes to cool completely.
- Level all the cake layers using a sharp knife or a cake leveler. Mine were all about 1 ½ inches thick. A consistent thickness looks really nice in the finished cake.
- Place cake in the freezer while you make the frosting (since it’s only going to be there 15-20 minutes, I don’t worry about wrapping it in plastic or anything, I just put my cakes on cookie sheets and place the whole thing in the freezer).
To Make the Frosting
- I like to use a stand mixer to make this icing recipe, but you can use an electric hand mixer as well. It’s hard to get it very fluffy and creamy by hand though.
- Add the butter and cream cheese to a large bowl or the bowl of your stand mixer and beat together until smooth.
- Add powdered sugar and beat until the mixture comes together.
- Add heavy cream, vanilla and salt and mix for 2-3 minutes or until the mixture is very light and fluffy.
- Remove 5 - ½ cup portions from basic white frosting and place those ½ cup portions into separate bowls.
- Color each ½ cup portion a different color- red, orange, yellow, green and blue. Once mixed, place in piping bags.
- Fill a large piping bag with the remaining white frosting.
To Assemble the Cakes
- Stack the chilled cakes with a generous portion of white frosting between each layer.
- Cover the cake with a very thin layer of frosting to seal in all the crumbs and use an offset spatula to evenly spread that layer out. It’ll be thin and a little messy, this is called the crumb coat.
- Chill cake in the refrigerator for 15 minutes to 1 hour.
- Pipe a thick white line of frosting along the bottom of the cake
- Pipe a red line of frosting on top of white line.
- Continue adding lines of frosting in orange, yellow, green and blue.
- Pipe white frosting to cover the remainder of the cake
- With a long spatula or bench scraper smooth out the frosting.
- Frost the top of the cake as well and spread it smooth with a long metal spatula.
- To make the multicolored swirls on the top of the cake, spread a piece of plastic wrap on a flat surface, pipe thick lines of all the colored frosting, right next to each other, in the middle of the cling wrap.
- Roll up the plastic wrap up so that the strips of icing are rolled together and twist the ends so it looks like a piece of wrapped hard candy. Cut one twisted end off, then carefully place the cut side down into a large piping bag prepared with a large star tip.
- Pipe rosettes on top of cake along the edge.
- Use sprinkles to create a border on the bottom edge of the cake.
- Your fabulous cake is done. Serve and enjoy!
Notes
- You can use 9 inch cake pans for a larger cake if you'd like. You'll want to use 3 cake mixed in that case (each mix would be divided into only two colors) and adjust the baking time accordingly. You may also need to increase the amount of frosting, depending on what you use for filling between the layers.
- You'll know that cakes are done when the spring back lightly when touched. If you press them lightly and it leaves an indent in the cake, they need to bake for a few more minutes.
- Because this is a vanilla cake with vanilla frosting, you could easily change out the filling to another flavor of frosting, jam, nutella, lemon curd, etc.
- Though it may be tempting, do not open the oven door while your cake layers are baking. They may crack or fall if you do!
Nutrition
Serving: 1 of 12 servings | Calories: 706kcal | Carbohydrates: 113g | Protein: 5g | Fat: 27g | Saturated Fat: 15g | Polyunsaturated Fat: 2g | Monounsaturated Fat: 8g | Trans Fat: 1g | Cholesterol: 96mg | Sodium: 490mg | Potassium: 73mg | Fiber: 1g | Sugar: 86g | Vitamin A: 714IU | Vitamin C: 0.01mg | Calcium: 162mg | Iron: 2mg